Quantcast
Channel: OSAKANA TAROのメモ帳
Viewing all 1106 articles
Browse latest View live

LSILogic RAIDのディスク交換をMegaCliを使って行う場合の手順メモ

$
0
0

IBM x3650サーバに入っているLSILogic RAIDカードにて、構成しているディスクが故障したので、ディスクを調達して交換したい。という話があったので、交換手順を確認した。

ついでに一般公開

参考文献
・やっ太郎ブログ:「Megacli64でディスク交換太郎
・チラシの裏的なBlog:「【備忘録】MegaRAIDでのエラーHDD交換手順
・IBM Docs:「2073-720 で障害予知機能 (PFA) イベントを報告する、障害が発生したドライブの取り替え
・Qiita:「HW保守で使いそうなTips 〜ディスク周り〜

(1) コマンドがある場所に移動

標準では /opt/MegaRAID/MegaCli/ にインストールされていて、PATHは通っていないことが多いので、ディレクトリ移動しておくと以降のコマンドが実行しやすい。

# cd /opt/MegaRAID/MegaCli/
#

(2) コマンド名確認

/opt/MegaRAID/MegaCli/に MegaCliもしくはMegaCli64があるかを確認
移行の手順はMegaCliだったものとして記載している

# ls -F

(3) RAID構成の状態を確認

Stateの状態を確認

# ./MegaCli -LDInfo -Lall -aALL

(4) 物理ディスクの状態を確認

# ./MegaCli -PDList -aALL
# ./MegaCli -PD List  -aALL | egrep 'Slot|Firmware state|Inquiry|Enclo'
# ./MegaCli -PD List  -aALL | egrep 'Slot|state|Data|Raw'

「Firmware state」がディスクの状態でFailedとなっているものが壊れている。

そのディスクについての「Enclosure Device ID」と「Slot Number」の値をこの後の手順で使うので記録しておく。

また「Inquiry Data」にあるディスク型番とシリアルが抜いたディスクとあっているかを確認出来るので、それも記録しておく。

(5) 壊れているディスクの場所を確認

壊れているディスクのLEDを点灯させて交換するディスクと、コマンドで指定する「 physdrv 」の指定が一致していることを、スロットのランプを点灯させて確認する。

下記コマンドを実行すると該当ディスクスロットのランプが点灯

# ./MegaCli -Pdlocate start physdrv[Enclosure Device ID:Slot Number] -a0

下記コマンドを実行すると該当ディスクスロットのランプが消灯

# ./MegaCli -Pdlocate stop physdrv[Enclosure Device ID:Slot Number] -a0
たとえば、Enclosure Device IDが252, Slot Numberが2の場合下記の様に実行する。
  # ./MegaCli -Pdlocate start physdrv[252:2] -a0
  # ./MegaCli -Pdlocate stop physdrv[252:2] -a0

(6) 壊れているディスクをオフラインにする

壊れているディスクをオフラインにする。

# ./MegaCli -PDOffline -PhysDrv [Enclosure Device ID:Slot Number] -a0

Enclosure Device IDが252, Slot Numberが2の場合下記の様になる

# ./MegaCli -PDOffline -PhysDrv [252:2] -a0

なお、壊れ方によっては、すでにオフライン扱いになっていて、このコマンドでエラーとなる場合がある。

(7) 欠落マークがついたRAIDがあるか確認する

6でエラーとなっている場合は、下記コマンドを実行した際に 「Array」と「Row」 といった情報が出力される。このArrayとRowの値はあとで使用します。

# ./MegaCli -PDGetMissing -aALL

6がエラーとなっていない場合は、Array/Rowの出力はないと思われます。

また、MegaCliコマンドのバージョンによっては、このオプションが存在せず、エラーとなる場合があるようです。その際はこの手順を飛ばします。

(8) 壊れているディスクに欠落マークを付ける

まだ壊れていることがきちんと認識されていない場合、壊れていることを確定させます。

# ./MegaCli -PDMarkMissing -PhysDrv [Enclosure Device ID:Slot Number] -a0

Enclosure Device IDが252, Slot Numberが2の場合下記の様になる

# ./MegaCli -PDMarkMissing -PhysDrv [252:2] -a0

MegaCliコマンドのバージョンによっては、PDMarkMissingオプションがないようです
その場合はこの手順を飛ばします。

また、6ですでに欠落マークがついたRAIDが認識されている場合もこの手順は不要であるはずです。

(9) 欠落マークがついたRAIDが認識されたことを確認する

欠落マークがついたRAIDが表示されることを確認します。

# ./MegaCli -PDGetMissing -aALL

この出力中の「Array」と「Row」の番号はあとで使用します。
PDMarkMissingオプションが実行できなかった場合、これも実行できない
と思います。その場合は飛ばします。

(10) 壊れているディスクを抜くことをRAIDコントローラに通知します

下記を実行して、指定したディスクを取り外すことをRAIDコントローラに通告します。

# ./MegaCli -PDPrpRmv -PhysDrv [Enclosure Device ID:Slot Number] -a0

下記の様に実行する

# ./MegaCli -PDPrpRmv -PhysDrv [252:2] -a0

なお、たぶん(6)の段階で欠落マークがついているような場合は、このコマンドを実行するまでもなくディスクが完全に壊れている、と認識されて、すでに抜けるような状態になっているようです。

(11) 壊れているディスクを物理的に抜く

(12) 1分ぐらい待つ

ここで待つのは気休めです。

RAIDコントローラの情報更新間隔がよくわからないので入れてますが、たぶん、すぐに実行しても問題ないような気がします・・・

(13) RAID構成/ディスク認識の状態を確認

ディスクの認識を抜いたことにより、RAID構成の状態が変わっているかを確認します。

# ./MegaCli -LDInfo -Lall -aALL

Stateの状態を確認します。(変わるのかどうかは把握していません)

次に、物理ディスクの状態変化を確認します。

# ./MegaCli -PDList -aALL
# ./MegaCli -PD List  -aALL | egrep 'Slot|Firmware state|Inquiry|Enclo'
# ./MegaCli -PD List  -aALL | egrep 'Slot|state|Data|Raw'

先ほど抜いたディスクに関する表示が消えているはずです。

(14) 新しいディスクを入れる

(15) RAID構成/ディスク認識の状態を確認

RAID状態が変わっているかを確認します。

# ./MegaCli -LDInfo -Lall -aALL

Stateの状態を確認します。
また、RAID構成が新しく認識されていたりしないか確認します。(中古ディスクに情報が残っている場合に発生する可能性がある)

交換したディスクが認識されているかを下記のコマンドで確認します。

# ./MegaCli -PDList -aALL
# ./MegaCli -PD List  -aALL | egrep 'Slot|Firmware state|Inquiry|Enclo'
# ./MegaCli -PD List  -aALL | egrep 'Slot|state|Data|Raw'

(16) 再構築が開始されているかを確認する

RAIDコントローラの設定および交換したディスクの状態によっては、ディスクを交換した時点で、自動的に再構築が開始されます。

下記コマンドで状況を確認します。

# ./MegaCli -pdrbld -showprog -physdrv [Enclosure Device ID:Slot Number] -a0

実行例は下記のようになります。

# ./MegaCli -pdrbld -showprog -physdrv [252:2] -a0

再構築が始まっている場合は progressの数値が徐々に増加していくはずです。

(17) RAIDにディスク交換されたことを認識させる

交換したディスクがスペアディスクなどとして認識されなかった場合は、手動で設定します。

# ./MegaCli -PdReplaceMissing -PhysDrv [Enclosure Device ID:Slot Number] -Array0 -row0 -a0

手順7か手順9で確認したArrayとRowの番号を使ってコマンドを実行します。実行例は下記のようになります。

# ./MegaCli -PdReplaceMissing -PhysDrv [252:2] -Array0 -row0 -a0

PDMarkMissingオプションが実行できなかった場合、これも実行できない
と思います。その場合は飛ばします。

(18) 再構築開始

手動で再構築開始を実行する場合は下記コマンドを実行します。

# ./MegaCli -PDRbld -Start -PhysDrv [Enclosure Device ID:Slot Number] -a0


下記の様に実行します。

# ./MegaCli -PDRbld -Start -PhysDrv [252:2] -a0

(19) 再構築状況を確認

再構築の状況を確認します。

# ./MegaCli -pdrbld -showprog -physdrv [Enclosure Device ID:Slot Number] -a0

下記の様に実行します。

# ./MegaCli -pdrbld -showprog -physdrv [252:2] -a0

(20) RAID構成/ディスク認識の状態を確認

RAID状態が変わっているかを確認します。

# ./MegaCli -LDInfo -Lall -aALL

Stateの状態を確認します。おそらくrebuildなどのステータスになっているかと思います。

また、交換したディスクが認識されているかを下記のコマンドで確認します。

# ./MegaCli -PDList -aALL
# ./MegaCli -PD List  -aALL | egrep 'Slot|Firmware state|Inquiry|Enclo'
# ./MegaCli -PD List  -aALL | egrep 'Slot|state|Data|Raw'

ONTAP 9.xでntpやDNSの動作確認

$
0
0

NetApp ONTAP 9.x環境でNTPやDNSの設定をした際に、正常に動作しているかを確認する手法

NTPの設定確認

NTP設定がされているかどうかを「cluster time-service ntp server show」で確認

::> cluster time-service ntp server show
                                        Is
                                        Authentication
Server                         Version  Enabled        Key ID
------------------------------ -------  -------------- ------
10.20.8.10                     auto     false          -

::>

NTPの動作確認

指定したNTPサーバと同期が取れているかは、adminモードでは確認出来ない。

advancedかdiagモードに切り替えて「cluster time-service ntp status show」を実行して確認。

::> set adv

Warning: These advanced commands are potentially dangerous; use them only when
         directed to do so by NetApp personnel.
Do you want to continue? {y|n}: y

::*> cluster time-service ntp status show

Node: netapp_02
Server                  Reachable  Selection State                Offset (ms)
----------------------- ---------  ------------------------------ ------------
10.20.8.10                   true  Currently Selected Server            21.552

Node: netapp_02
Server                  Reachable  Selection State                Offset (ms)
----------------------- ---------  ------------------------------ ------------
10.20.8.10                   true  Currently Selected Server             21.68
2 entries were displayed.

::*>

上記の様に「Reachable:true」となっていればNTPサーバと通信が取れている。

下記の様に「Reachable:false」となっている場合は接続が取れないか、リトライ中である。

::*> cluster time-service ntp status show

Node: netapp_01
Server                  Reachable  Selection State                Offset (ms)
----------------------- ---------  ------------------------------ ------------
10.20.8.10                  false  Server Not Responding or Too              0
                                   Distant

Node: netapp_02
Server                  Reachable  Selection State                Offset (ms)
----------------------- ---------  ------------------------------ ------------
10.20.8.10                  false  Server Not Responding or Too              0
                                   Distant
2 entries were displayed.

::*>

なお、-insオプションを付けると詳細が確認出来る。

::*> cluster time-service ntp status show -ins

                                      Node: netapp_01
NTP Server Host Name, IPv4 or IPv6 Address: 10.20.8.10
                         Server IP Address: 10.20.8.10
Is Peer Reachable and Responding to Polls?: true
         Is Peer Selected as Clock Source?: true
                 State of Server Selection: sys_peer
     Description of Server Selection State: Currently Selected Server
                      Poll Interval (secs): 64
                Time from Last Poll (secs): 9
              Offset from Server Time (ms): -16.61
                 Delay Time to Server (ms): 0.395
                 Maximum Offset Error (ms): 20.946
                    Reachability of Server: 1f
                   Stratum of Server Clock: 2
                 Reference Clock at Server: 133.243.238.163
           Reported Packet and Peer Errors: -

                                      Node: netapp_02
NTP Server Host Name, IPv4 or IPv6 Address: 10.20.8.10
                         Server IP Address: 10.20.8.10
Is Peer Reachable and Responding to Polls?: true
         Is Peer Selected as Clock Source?: true
                 State of Server Selection: sys_peer
     Description of Server Selection State: Currently Selected Server
                      Poll Interval (secs): 64
                Time from Last Poll (secs): 14
              Offset from Server Time (ms): 6.623
                 Delay Time to Server (ms): 0.398
                 Maximum Offset Error (ms): 17.906
                    Reachability of Server: 1f
                   Stratum of Server Clock: 2
                 Reference Clock at Server: 133.243.238.163
           Reported Packet and Peer Errors: -
2 entries were displayed.

::*>

DNSの設定確認

DNSに関する設定は「vserver services name-service dns show」を実行する。

ontap98::> vserver services name-service dns show
                                                    Name
Vserver         Domains                             Servers
--------------- ----------------------------------- ----------------
ontap98         adosakana.local                   172.17.44.49
share225        adosakana.local                  172.17.44.49
share228        adosakana.local                  172.17.44.49
3 entries were displayed.

ontap98::>

Active Directoryに参加している場合は、DNSの自動更新に関する設定も重要なので「vserver services name-service dns dynamic-update show」で確認する。

ontap98::> vserver services name-service dns dynamic-update show
Vserver         Is-Enabled Use-Secure Vserver FQDN             TTL
--------------- ---------- ---------- ------------------------ -------
share225        true       false      adosakana.local    24h
share228        false      false      -                        24h
2 entries were displayed.

ontap98::>

上記例では、Storage VM:share225ではDNS自動更新を有効にしている、ということになる。

/etc/hosts ファイルに相当する固定の名前解決を行っているかは「vserver services name-service dns hosts show」で確認する。

注意が必要なのは、「NetAppのクラスタ管理」と「各Storage VM」でそれぞれ別の設定になっているということ。これを勘違いしているとうまく名前解決が実施できない。

ネットワークインタフェースとルーティングの設定も関係してくるので「network interface show」と「network route show」も確認すると良い。

DNSの動作確認

DNSサーバに接続ができているかは「vserver services name-service dns check -vserver SVM名 -ins」で確認出来る。

ontap98::> vserver services name-service dns check  -vserver ontap98 -ins

           Vserver: ontap98
       Name Server: 172.17.44.49
Name Server Status: up
    Status Details: Response time (msec): 1

ontap98::>

上記はStorageVM:ontap98 に対して確認を実施した結果となり、「Name Server status:up」で「Response time(msec)」の値があるのでDNSサーバ応答があった、ということになる。

指定したホスト名が名前解決できるかはadvancedモード/diagモードが必須となる。

コマンドは「vserver services name-service getxxbyyy getaddrinfo -vserver SVM名 -hostname 解決したいホスト名」か「vserver services name-service getxxbyyy gethostbyname -vserver SVM名 -hostname 解決したいホスト名」となる。

ontap98::> set advanced

Warning: These advanced commands are potentially dangerous; use them only when directed to do so by NetApp personnel.
Do you want to continue? {y|n}: y

ontap98::*>vserver services name-service getxxbyyy getaddrinfo -vserver ontap98 -hostname adserver
Host name: adserver
Canonical Name: adserver.adosakana.local
IPv4: 172.17.44.49


ontap98::*>

IPアドレスの逆引きは 「vserver services name-service getxxbyyy getnameinfo -vserver SVM名 -ipaddress IPアドレス」 か 「vserver services name-service getxxbyyy getnameinfo -vserver SVM名 -ipaddress IPアドレス 」 となる

ontap98::*> vserver services name-service getxxbyyy gethostbyaddr -vserver ontap98 -ipaddress 172.17.44.49
IP address: 172.17.44.49
Host name: adserver.adosakana.local


ontap98::*>

Firewall内のCentOSからhttps://mirror.centos.org/にアクセスできなかった件

$
0
0

FortigateによるFirewall内にあるCentOS9サーバから「dnf check-update」を実行してみたところ、失敗した。

[root@centos9 ~]# dnf update
サブスクリプション管理リポジトリーを更新しています。
コンシューマー識別子を読み込めません

このシステムは、エンタイトルメントサーバーに登録されていません。subscription-manager で登録できます。

CentOS Stream 9 - BaseOS                        0.0  B/s |   0  B     00:03
Errors during downloading metadata for repository 'baseos':
  - Curl error (60): SSL peer certificate or SSH remote key was not OK for https://mirrors.centos.org/metalink?repo=centos-baseos-9-stream&arch=x86_64&protocol=https,http [SSL certificate problem: self-signed certificate in certificate chain]
エラー: repo 'baseos' のメタデータのダウンロードに失敗しました : Cannot prepare internal mirrorlist: Curl error (60): SSL peer certificate or SSH remote key was not OK for https://mirrors.centos.org/metalink?repo=centos-baseos-9-stream&arch=x86_64&protocol=https,http [SSL certificate problem: self-signed certificate in certificate chain]
[root@centos9 ~]#

内容的には https://mirrors.centos.org/ へのアクセスでエラーになっていたので、curlコマンドで状況を確認してみることにした。

[root@centos9 ~]# curl -vvv https://mirrors.centos.org/publiclist/
*   Trying 13.125.120.8:443...
* Connected to mirrors.centos.org (13.125.120.8) port 443 (#0)
* ALPN, offering h2
* ALPN, offering http/1.1
*  CAfile: /etc/pki/tls/certs/ca-bundle.crt
* TLSv1.0 (OUT), TLS header, Certificate Status (22):
* TLSv1.3 (OUT), TLS handshake, Client hello (1):
* TLSv1.2 (IN), TLS header, Certificate Status (22):
* TLSv1.3 (IN), TLS handshake, Server hello (2):
* TLSv1.2 (IN), TLS header, Finished (20):
* TLSv1.2 (IN), TLS header, Unknown (23):
* TLSv1.3 (IN), TLS handshake, Encrypted Extensions (8):
* TLSv1.2 (IN), TLS header, Unknown (23):
* TLSv1.3 (IN), TLS handshake, Certificate (11):
* TLSv1.2 (OUT), TLS header, Unknown (21):
* TLSv1.3 (OUT), TLS alert, unknown CA (560):
* SSL certificate problem: self-signed certificate in certificate chain
* Closing connection 0
curl: (60) SSL certificate problem: self-signed certificate in certificate chain
More details here: https://curl.se/docs/sslcerts.html

curl failed to verify the legitimacy of the server and therefore could not
establish a secure connection to it. To learn more about this situation and
how to fix it, please visit the web page mentioned above.
[root@centos9 ~]#

同じ環境にあるCentOS7サーバやOracle Linux8サーバでも同じ結果になった。

他の環境にあるCentOS7サーバで実行してみると下記のような感じになった。

-bash-4.2$ curl -vvv https://mirrors.centos.org/publiclist/
* About to connect() to mirrors.centos.org port 443 (#0)
*   Trying 2620:52:3:1:dead:beef:cafe:fed6...
* Connected to mirrors.centos.org (2620:52:3:1:dead:beef:cafe:fed6) port 443 (#0)
* Initializing NSS with certpath: sql:/etc/pki/nssdb
*   CAfile: /etc/pki/tls/certs/ca-bundle.crt
  CApath: none
* SSL connection using TLS_ECDHE_RSA_WITH_AES_128_GCM_SHA256
* Server certificate:
*       subject: CN=mirrors.centos.org
*       start date: 10月 19 06:06:54 2021 GMT
*       expire date:  1月 17 06:06:53 2022 GMT
*       common name: mirrors.centos.org
*       issuer: CN=R3,O=Let's Encrypt,C=US
> GET /publiclist/ HTTP/1.1
> User-Agent: curl/7.29.0
> Host: mirrors.centos.org
> Accept: */*
>
< HTTP/1.1 302 Found
< Date: Fri, 12 Nov 2021 08:44:59 GMT
< Server: Apache
< X-Frame-Options: SAMEORIGIN
< X-Xss-Protection: 1; mode=block
< X-Content-Type-Options: nosniff
< Referrer-Policy: same-origin
< Location: https://admin.fedoraproject.org/mirrormanager/
< Content-Length: 299
< Content-Type: text/html; charset=iso-8859-1
<
<!DOCTYPE HTML PUBLIC "-//IETF//DTD HTML 2.0//EN">
<html><head>
<title>302 Found</title>
</head><body>
<h1>Found</h1>
<p>The document has moved <a href="https://admin.fedoraproject.org/mirrormanager/">here</a>.</p>
<hr>
<address>Apache Server at mirrors.centos.org Port 443</address>
</body></html>
* Connection #0 to host mirrors.centos.org left intact
-bash-4.2$

Let’s Encryptの証明書使ってるな、ということで、同じ環境にあるブラウザからアクセスしてみると、Fortigateによるhttps周りの動作の問題であることが判明

解決方法は「FortiGate環境で”This Connection is Invalid. SSL certificate expired.”を食らった」にあるやつと同じでした。

SteamDeck疑似環境の構築方法

$
0
0

Steam Deckという手持ちゲーミング端末がリリースされる予定になっている。

現状は一部の開発者向けに実機の提供が行われているが、それ以外のPCでもSteam Deckで使われるManjaro Linux OSをインストールすることで検証ができるように公式の手順が公開されていた。

Developing for Steam Deck without a Dev-Kit

書いてある内容を要約すると・・・

ハードウェア構成

本体:MINISFORUM Elite Mini UM700 (日本代理店 Linksの製品紹介)の Ryzen 7 3750H 搭載モデル

AmazonのMINIFORUM直販より、日本代理店Links直販が安い場合も・・・


ディスプレイ:7インチで1280*800のカーナビ液晶を流用しているものを適当に調達

コントローラ: PS4コントローラかPS5コントローラが最適。XBOXやスイッチ用も使えなくは無いが、トラックパッドがないためフル機能が使えないことに注意。

以前売ってたSteam純正コントローラについては触れられてない・・・

OS設定について

Manjaro LinuxのKDE Plasmaエディションをインストールする。

注:実際にはGPD Pocketでインストールしてみたが、画面キャプチャが面倒だったので、以降の手順は仮想環境で行ったもので代用している。

インストーラで起動すると、下記の様に表示される

環境に合わせて「tz(タイムゾーン)」「keytable(キーボード配列)」「lang(表示言語)」を選び、「Boot with ~」を選ぶ。どっちがいいかは環境による?

しばらく待つとKDEデスクトップが表示される。

この状態でsteam導入もできなくはないのだが、起動ごとに毎回設定がやり直しになるので推奨しない。(OSアップデートがあると警告が表示されたりするが、再起動すると消えるので毎回表示される)

内蔵ディスクや、さらに別途用意したUSBメモリなどへインストールをした方が良い。

インストールはデスクトップ上の「Install Manjaro Linux」をクリックして、インストーラを進めていく。

標準では「スワップを使用しない」が設定されているが、どちらの方がいいんだろうか?(使用しないで進めた)

ゲーミング用途なら、パスワードなしの自動ログイン想定かなぁ?と

インストールを開始します。

…?

FAT32パーテーションを作成した後のLinuxパーテーション作成に失敗している?

パーテーション容量を最大サイズから少し減らしたらインストールが始まった・・・(パーテーション設定のキャプチャなし)

インストール完了

内蔵ディスクから起動しているのでデスクトップ上にInstallのアイコンが消えています。

つづいて、steamのセットアップを実施

左下の「m」メニューから「ゲーム」の「Steam (Runtime)」を選択するか

デスクトップ上で右クリックメニューにある「Show KRunnner」を選択

表示されるウィンドウに「steam」と入力して「アプリケーション Steam(Runtime)」を選択します。

そうするとデスクトップ上に「Steam (Runtime)」アイコンが追加され、Steam setupが開始されます。

セットアップではいろいろダウンロードが行われていきます。

いろいろ処理しているウィンドウが表示されなくなったらダウンロードが終わりなようで、改めてデスクトップ上の「Steam (Runtime)」をクリックすると、Steamのログイン画面が表示されます。

steamにログインすると、まあ、普通に表示されます。

最初に「Steam」の「Settings」を開きます。

「Interface」のlanguageを「日本語(Japanese)」に変更

「Steam Play」の「Enable Steam Play for all other titles」にチェックを入れて、Windowsエミュレーション機能を有効にします。

この設定でいろんなゲームがインストール可能な状態となります。

インストールを選ぶと選択したゲームの他に「Proton(Windowsエミュレーション機能)」と「Steamworks Common Redistributables」のダウンロードが始まります。

ダウンロードが終わり「プレイ」を選択します。

そうすると、「プラットフォーム互換ツールを使用して、このゲームをSteam Playで起動します」というメッセージが表示されます。

ゲームによっては起動前に Microsoft VC Redist Packageインストールなどの処理も実行されます。

やっかいな事に、こういった共有ライブラリが必須であるにも関わらず、特に設定されていないゲームの場合は、プレイボタンを押しても開始に失敗してしまいます。(そういうゲームで起動失敗した場合は何も表示されず、ただゲーム一覧のプレイボタンが再度押せるように戻っていることで察する、という感じ)

なお、仮想環境上での検証は下記の様な感じでDirectX11が上手く動かずに失敗となりました。

GPD Pocket 1で実験した所、FF3は実用的な速度で動作

A列車でいこう9は、かなり遅いものの動く

ライザのアトリエについては、タイトル画面までは出たものの、それ以後の画面は表示できず、という状態でした。

Oracle Cloudで人に仮想マシンを作ってもらうための準備

$
0
0

Oracle CloudのFree Tierで仮想マシン作りたいけど、誰かに最初の設定をお任せしたい、という時の手順。

超絶に簡易的なもので、セキュリティ関連を考慮しない、全権限を渡してしまうタイプの手順になっていますので注意。

その1: Oracle Cloudにアカウントを作る

Oracle公式の「チュートリアル – Oracle Cloud Infrastructure を使ってみよう」を参照しながら実施します。

その2: Oracle Cloudの管理画面にログインする

その3:ユーザー管理画面を開く

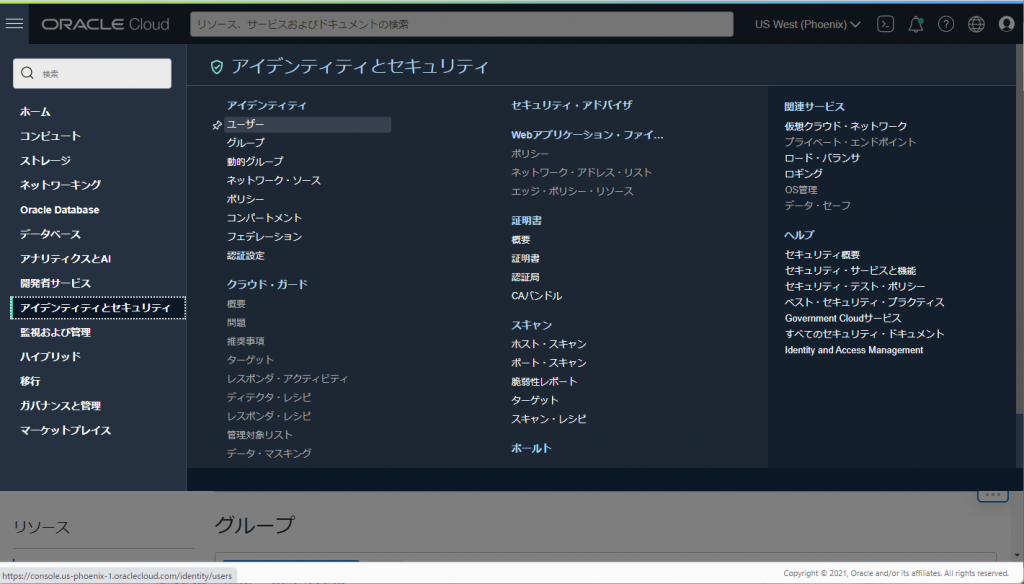
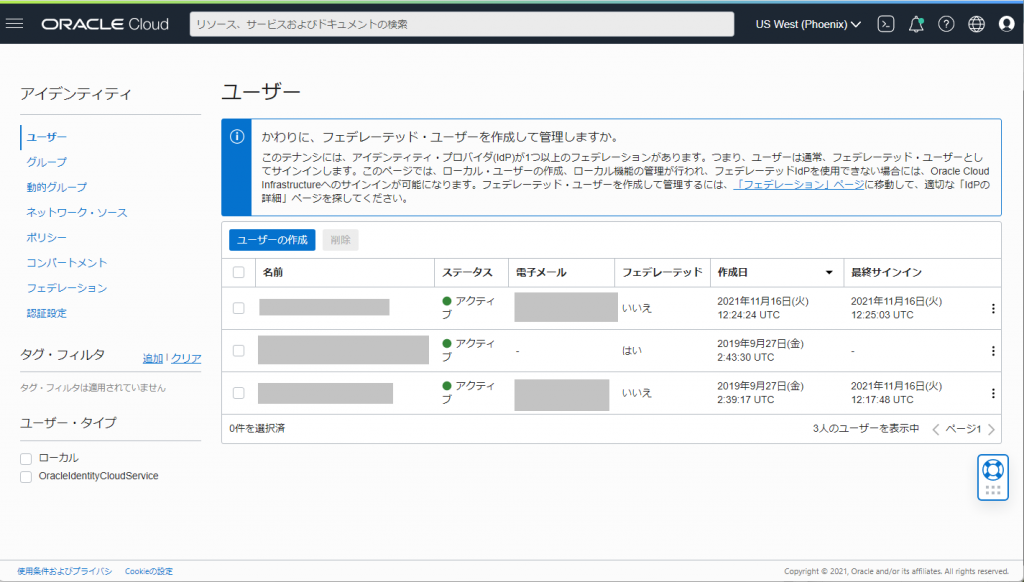
「アイデンティティとセキュリティ」の「ユーザー」を開きます。

開くと現在登録されているユーザー一覧が表示されます。

その4: ユーザー追加

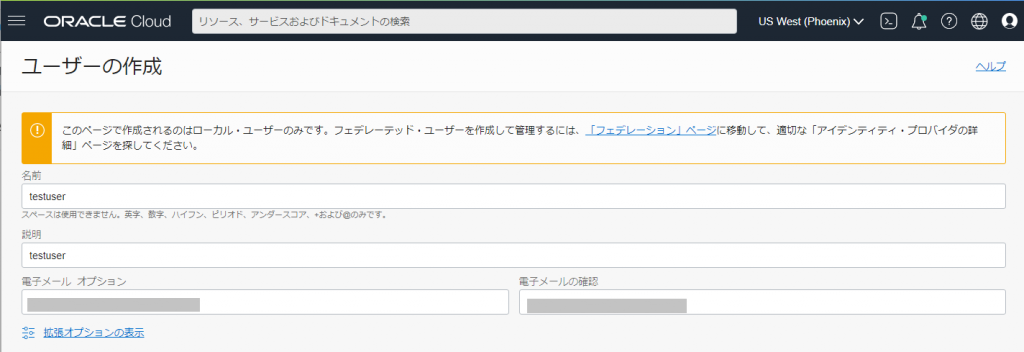
「ユーザーの作成」をクリックして、下記の画面で「名前」としてログインする際に入力するユーザの名前を指定します。

説明はユーザを区別しやすくするためのものを入れて、最後にユーザー作成メールが届くメールアドレスを入力します。

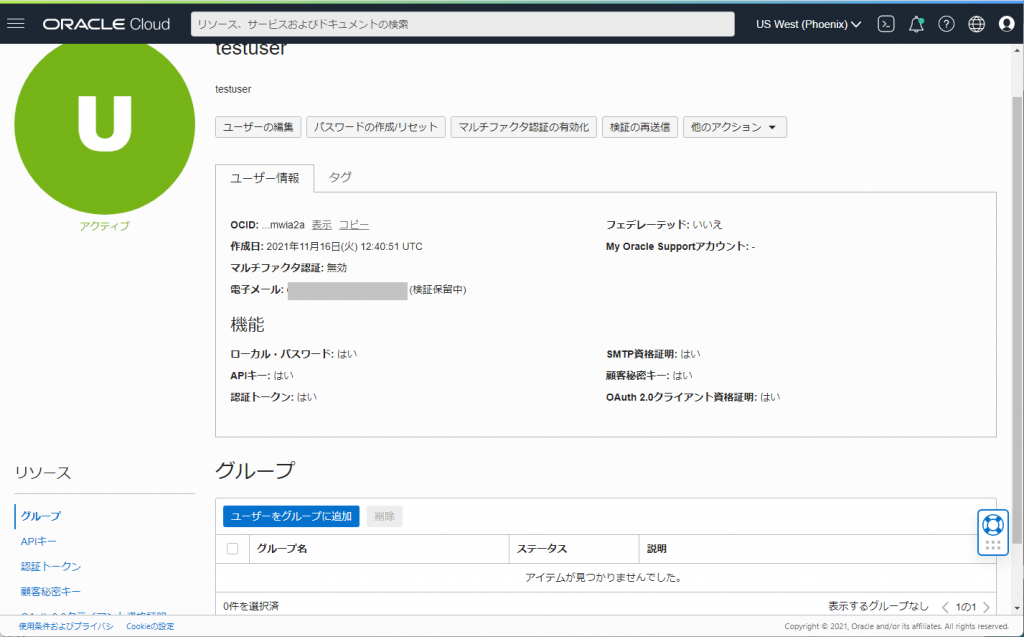
作成すると下記のようなユーザー画面に移動します

電子メールのところが「検証保留中」となっています。

「ユーザーのパスワード作成/リセット」を選択します

ここで「パスワードの作成/リセット」をクリックすると下記の画面になります。

このパスワードは、認証する際に必要となります。ユーザ作成時に指定したメールアドレスのユーザに何らかの手段で伝えてください。

その5: ユーザー権限の追加

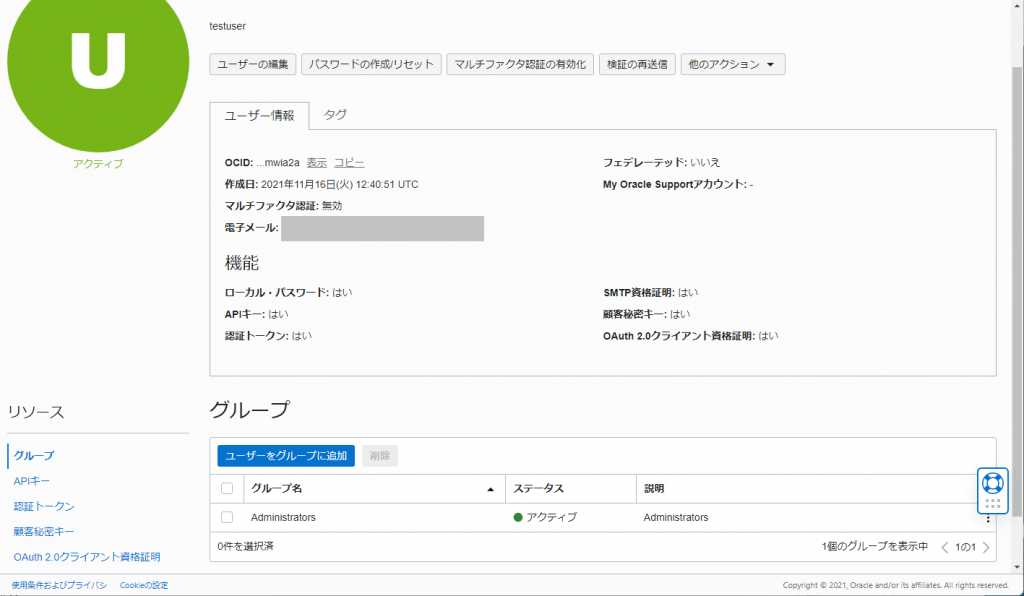
「ユーザーをグループに追加」を選択し、「Administrators」を選び、追加します

これでそのユーザに全ての権限を割り当てています。

なので、仮想マシンの削除も出来てしまいます。作業が終わったあとの取り扱いに注意が必要です。

その6: 届いたユーザ側の手続き

指定したメールアドレスには下記の様なメールが届いています。

URLをクリックして、もらったユーザ名とパスワードを入力してログインします。

そして作業をやっていきます。

作業完了後手順

作業が終わったら、ユーザーのグループにある「administrators」の登録を削除します。

各ユーザの「グループ」にあるAdministratorの前にあるチェックボックスにチェックを入れて「削除」をクリックします。

「メンバーの削除」を選択すると下記の様にグループになにも表示されない状態となります。

この状態であればログインは出来るけど、作業はなにもできません。

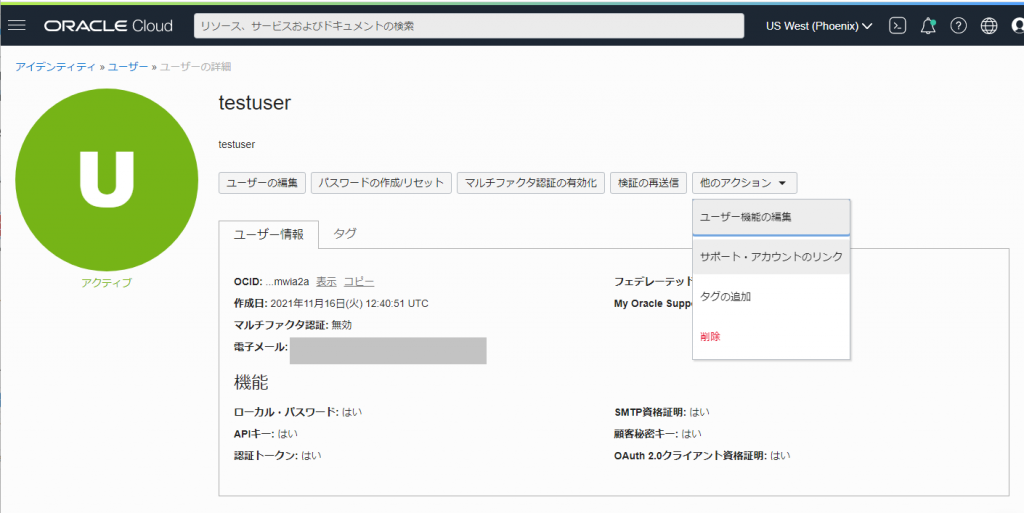
そこからさらくユーザーの削除を行う場合は「他のアクション」から「削除」を選択します。

これでログインもできなくなりました。

なお、この手順で削除されるのはOracle CLoudの管理画面だけで、別途wordpressなどの管理画面アクセスについてはそちらの設定で削除する必要がある点に注意してください。

はてなブログからwordpressへぶっこぬきで移行した話

$
0
0

現在はてなブログで運用しているけど、画像付きでのエクスポートができない、とかいう話を聞いた。

ローカルに静的コンテンツとして取り込もう

とりあえず、本文と画像をダウンロードすればいいだろう、と、まずは簡単に下記でコンテンツ取得をかけた。

wget --mirror \
    --page-requisites \
    --quiet --show-progress \
    --no-parent \
    --convert-links \
    --adjust-extension \
    --execute robots=off \
    https://retoge-mag.hatenablog.com/

適当なWebサーバに配置して見てみると、HTMLのみで、そしてサイト内リンクもhttpsからフルで指定されているタイプだったので、URL書き換えを雑に実施。

他にもHTML書き換えが必要だろう、ということでダウンロードしてきたやつではなく、閲覧用のHTMLを別に用意することにして、下記の様に実行した。

cp -r retoge-mag.hatenablog.com viewpage

for file in `find ./viewpage -name \*.html -print`
do
 sed -i -e "s/retoge-mag.hatenablog.com/retoge-mag.websa.jp\/old\/viewpage/g" $file
done

これでまずはHTMLのみがコピーされた状態だが、リンクをいくつかクリックしてみると404 not foundとなるものがある。

日付ごとのまとめはダウンロードされていないが、これについては無視することとした。

個別記事のリンクで、末尾が数字で終わっているものがいくつかあり、それで404が発生していた。それらのコンテンツは数字.htmlという形でダウンロードされていたので .htaccess に下記の設定を行った。

<IfModule mod_rewrite.c>
RewriteEngine On

RewriteCond     %{REQUEST_FILENAME} !-f
RewriteRule     ^(.*)$ $1.html [L]

</IfModule>

次に画像のダウンロードを行った。

HTMLからhttp か httpsで始まるリンクっぽいものを集めてみると画像は st-hatena.com というドメイン名の所に置いてあるようだった。

なので、下記スクリプトを実行して、該当するURLを全てダウンロードしてきた。

for file in `find ./viewpage -name \*.html -print`
do
 grep -oE 'http(s?)://[0-9a-zA-Z?=#+_&:;/.%\-]+' $file >> urllists.txt
done
sort urllists.txt | uniq > urllists2.txt
grep st-hatena.com urllists2.txt > urllists3.txt
wget --mirror     --page-requisites     --quiet --show-progress     --no-parent     --convert-links     --adjust-extension -i urllists3.txt

なお、最初は「grep -oE ‘http(s?)://[0-9a-zA-Z?=#+_&:/.%-]+’ $file >> urllists.txt」だったのだが、縮小処理をかけた画像のURLに;が含まれていたので、追加している。

画像はローカルにダウンロードできたものの、HTMLの方は書き換わっていないため、以下で書き換えを実施した。

for file in `find ./viewpage -name \*.html -print`
do
 sed -i -e "s/b.st-hatena.com/retoge-mag.websa.jp\/old\/b.st-hatena.com/g" $file
 sed -i -e "s/cdn-ak.f.st-hatena.com/retoge-mag.websa.jp\/old\/cdn-ak.f.st-hatena.com/g" $file
 sed -i -e "s/cdn.blog.st-hatena.com/retoge-mag.websa.jp\/old\/cdn.blog.st-hatena.com/g" $file
 sed -i -e "s/cdn.pool.st-hatena.com/retoge-mag.websa.jp\/old\/cdn.pool.st-hatena.com/g" $file
 sed -i -e "s/cdn.profile-image.st-hatena.com/retoge-mag.websa.jp\/old\/cdn.profile-image.st-hatena.com/g" $file
 sed -i -e "s/cdn.user.blog.st-hatena.com/retoge-mag.websa.jp\/old\/cdn.user.blog.st-hatena.com/g" $file
 sed -i -e "s/usercss.blog.st-hatena.com/retoge-mag.websa.jp\/old\/usercss.blog.st-hatena.com/g" $file
done

これで、見栄えは悪いものの画像ファイル含めてローカルにコンテンツ自体はコピーされた。

WordPressに取り込もう

あまりにも見栄えが悪いので、やっぱりWordpressに取り込むべきか、とインポート用XMLファイルを作ることにする。

WordPressのサイトを調べたのだがインポート用XMLファイルの仕様がよくわからなかった。

まず、Wordpressで適当に記事とカテゴリを作成して、それをエクスポートしたXMLを作成した。

結構いらない要素が多い感じがしたので最小限の記述はなにか探したところ「Simple WordPress Import Structure XML Example」を発見。

<?xml version="1.0" encoding="UTF-8" ?>

<rss version="2.0"
	xmlns:excerpt="http://wordpress.org/export/1.2/excerpt/"
	xmlns:content="http://purl.org/rss/1.0/modules/content/"
	xmlns:wfw="http://wellformedweb.org/CommentAPI/"
	xmlns:dc="http://purl.org/dc/elements/1.1/"
	xmlns:wp="http://wordpress.org/export/1.2/"
>

<channel>
	<wp:wxr_version>1.2</wp:wxr_version>
	<wp:author></wp:author>

	<item>
		<title>Test 1</title>
		<description></description>
		<content:encoded><![CDATA[Test Post 1]]></content:encoded>
		<excerpt:encoded><![CDATA[]]></excerpt:encoded>
		<wp:status>publish</wp:status>
		<wp:post_type>post</wp:post_type>
		<category domain="post_tag" nicename="redy"><![CDATA[redy]]></category>
		<category domain="category" nicename="teory"><![CDATA[Teory]]></category>
		<category domain="category" nicename="tree"><![CDATA[Tree]]></category>
	</item>
	<item>
		<title>Test 2</title>
		<description></description>
		<content:encoded><![CDATA[Test Post 2]]></content:encoded>
		<excerpt:encoded><![CDATA[]]></excerpt:encoded>
		<wp:status>publish</wp:status>
		<wp:post_type>post</wp:post_type>
		<category domain="category" nicename="test-category"><![CDATA[Test Category]]></category>
	</item>
</channel>
</rss>

これをベースに作成することにした。

はてなブログが出力したHTMLから下記の要素を抜き出してXMLタグを出力する test.plを作成した。

#!/bin/perl
#

use strict;
use warnings;

my $sourcefile=$ARGV[0];

if(!-f $sourcefile){
        print "file not found\n";
        exit 1;
}

my $i=0;
my @bodys;

open(FILE,$sourcefile);
while(<FILE>){
        $bodys[$i]=$_;
        $i++;
}
close(FILE);

my $maxline=$i;
my $line;

my ($st,$ed,$tmp);

my $createdate="";
my $modifydate="";
my $title="";
my $categorys="";
my $categoryssub="";
my $categorysterm="";
my $author="";
my $contents="";
my $description="";

$i=0;
while($i<$maxline){
        $line=$bodys[$i];
        if(($line =~ /<time datetime=/)&&($createdate eq "")){
                # 作成日取得
                # 下の方に他のページのdatetimeもあるので1個目だけ採用
                $st=index($line,"datetime=");
                $st=index($line,"\"",$st)+length("\"");
                $ed=index($line,"\"",$st);
                $createdate=substr($line,$st,$ed-$st);
        #}elsif(($line =~ /entry-footer-time/)&&($line =~ /class=\"updated\"/)){
        }elsif($line =~ /dateModified/){
                # 更新日取得
                $st=index($line,"dateModified");
                $st=index($line,":",$st);
                $st=index($line,"\"",$st)+length("\"");
                $ed=index($line,"\"",$st);
                $modifydate=substr($line,$st,$ed-$st);
        }elsif($line =~ /entry-title-link/){
                # タイトル取得
                $st=index($line,">")+length(">");
                $ed=index($line,"</",$st);
                $title=substr($line,$st,$ed-$st);
        }elsif($line =~ /entry-categories/){
                # カテゴリ取得
                my $flag=0;
                while($flag==0){
                        $i++;
                        $line=$bodys[$i];
                        if($line =~/<\/div>/){
                                # カテゴリ終了
                                $flag=1;
                        }elsif($line =~ /entry-category-link/){
                                $st=index($line,">")+length(">");
                                $ed=index($line,"</",$st);
                                $tmp=substr($line,$st,$ed-$st);
                                $categorys.="<category domain=\"category\" nicename=\"".$tmp."\" ><![CDATA[".$tmp."]]></category>";
                        }
                }
        }elsif($line =~ /author vcard/){
                # 作者取得
                $ed=index($line,"</");
                $st=rindex($line,">",$ed)+length(">");
                $author=substr($line,$st,$ed-$st);
        }elsif($line =~ /entry-content/){
                # 本文取得
                my $flag=0;
                while($flag==0){
                        $i++;
                        $line=$bodys[$i];
                        if($line =~/entry-footer/){
                                # 本文終了
                                $flag=1;
                        }else{
                                $contents.=$line;
                        }
                }
        }elsif($line =~ /og:description/){
                # description取得
                $st=index($line,"content=\"")+length("content=\"");
                $ed=index($line,"\"",$st);
                $description=substr($line,$st,$ed-$st);
        }


        $i++;
}
# URL変換処理
$contents =~ s/b.st-hatena.com/retoge-mag.websa.jp\/old\/b.st-hatena.com/g;
$contents =~ s/cdn-ak.f.st-hatena.com/retoge-mag.websa.jp\/old\/cdn-ak.f.st-hatena.com/g;
$contents =~ s/cdn.blog.st-hatena.com/retoge-mag.websa.jp\/old\/cdn.blog.st-hatena.com/g;
$contents =~ s/cdn.pool.st-hatena.com/retoge-mag.websa.jp\/old\/cdn.pool.st-hatena.com/g;
$contents =~ s/cdn.profile-image.st-hatena.com/retoge-mag.websa.jp\/old\/cdn.profile-image.st-hatena.com/g;
$contents =~ s/cdn.user.blog.st-hatena.com/retoge-mag.websa.jp\/old\/cdn.user.blog.st-hatena.com/g;
$contents =~ s/usercss.blog.st-hatena.com/retoge-mag.websa.jp\/old\/usercss.blog.st-hatena.com/g;

#


print "<item>\n";
print "<description>".$description."</description>\n";
print "<excerpt:encoded><![CDATA[]]></excerpt:encoded>\n";
print "<wp:status>publish</wp:status>\n";
print "<wp:post_type>post</wp:post_type>\n";
print "<wp:post_date_gmt>".$createdate."</wp:post_date_gmt>\n";
#print "<wp:post_modified_gmt>".$modifydate."</wp:post_modified_gmt>\n";
print "<wp:post_modified>".$modifydate."</wp:post_modified>\n";
print "<title><![CDATA[".$title."]]></title>\n";
print $categorys."\n";
#print "<dc:creator><![CDATA[".$author."]]></dc:creator>\n";
print "<dc:creator><![CDATA[pc88multi2]]></dc:creator>\n";
#print "<content:encoded><![CDATA[<!-- wp:paragraph -->\n".$contents."<!-- /wp:paragraph -->]]></content:encoded>\n";
print "<content:encoded><![CDATA[".$contents."]]></content:encoded>\n";
print "</item>\n";

このtest.pl は単体ファイルに対してのみ実行されるので、対象ファイル群に対して実行するために下記の別スクリプトを用意して実行した。

echo '<?xml version="1.0" encoding="UTF-8" ?>' > wordpress.xml
echo '<rss version="2.0" xmlns:excerpt="http://wordpress.org/export/1.2/excerpt/" xmlns:content="http://purl.org/rss/1.0/modules/content/" xmlns:wfw="http://wellformedweb.org/CommentAPI/"  xmlns:dc="http://purl.org/dc/elements/1.1/" xmlns:wp="http://wordpress.org/export/1.2/" >' >> wordpress.xml

echo '<channel><wp:wxr_version>1.2</wp:wxr_version>' >> wordpress.xml
echo '<wp:author></wp:author>' >> wordpress.xml

for file in `find retoge-mag.hatenablog.com/entry/* -name \*.html`
do echo --- $file ---
        ./test.pl $file >> wordpress.xml
done

echo '</channel>' >> wordpress.xml
echo '</rss>' >> wordpress.xml

こうして出力されたwordpress.xmlをWordpressにてインポートすることで取り込みは完了した。

なお、画像ファイルについては、ローカルにコピーした際のURLをそのまま利用し、Wordpress管理下には置かなかった。

Oracle Linux 8でphp 7.4.19-1にアップデート後からphp-fpmが起動しなくなった

$
0
0

Oracle Cloud上にARMインスタンスをたててOracle Linux 8をインストールしてwordpressサーバの運用を開始した。

ところが今日の朝実行された dnf automaticによる自動更新後、wordpressが「Service Unavailable」となり表示出来ない。

sshログインして確認するとphp-fpmが起動していない。

[root@retoge ~]# systemctl status php-fpm|cat
● php-fpm.service - The PHP FastCGI Process Manager
   Loaded: loaded (/usr/lib/systemd/system/php-fpm.service; disabled; vendor preset: disabled)
   Active: failed (Result: exit-code) since Thu 2021-11-18 09:25:41 JST; 16s ago
  Process: 482320 ExecStart=/usr/sbin/php-fpm --nodaemonize (code=exited, status=127)
 Main PID: 482320 (code=exited, status=127)

Nov 18 09:25:41 retoge systemd[1]: Starting The PHP FastCGI Process Manager...
Nov 18 09:25:41 retoge php-fpm[482320]: /usr/sbin/php-fpm: error while loading shared libraries: cannot restore segment prot after reloc: Permission denied
Nov 18 09:25:41 retoge systemd[1]: php-fpm.service: Main process exited, code=exited, status=127/n/a
Nov 18 09:25:41 retoge systemd[1]: php-fpm.service: Failed with result 'exit-code'.
Nov 18 09:25:41 retoge systemd[1]: Failed to start The PHP FastCGI Process Manager.
[root@retoge ~]#

SELinuxの問題で起動していなさそうなので/var/log/audit/audit.log を確認してみると下記の出力があった。

type=AVC msg=audit(1637195141.234:5827): avc:  denied  { execmod } for  pid=482320 comm="php-fpm" path="/usr/sbin/php-fpm" dev="dm-0" ino=369761 scontext=system_u:system_r:httpd_t:s0 tcontext=system_u:object_r:httpd_exec_t:s0 tclass=file permissive=0

type=SERVICE_START msg=audit(1637195141.238:5828): pid=1 uid=0 auid=4294967295 ses=4294967295 subj=system_u:system_r:init_t:s0 msg='unit=php-fpm comm="systemd" exe="/usr/lib/systemd/systemd" hostname=? addr=? terminal=? res=failed'^]UID="root" AUID="unset"

関連していそうなファイルのセキュリティコンテキストを確認

[root@retoge ~]# ls -lZ /usr/sbin/php-fpm
-rwxr-xr-x. 1 root root system_u:object_r:httpd_exec_t:s0 4656056 Oct 12 18:47 /usr/sbin/php-fpm
[root@retoge ~]# restorecon -R -v /usr/sbin
[root@retoge ~]# ls -lZ /usr/sbin/php-fpm
-rwxr-xr-x. 1 root root system_u:object_r:httpd_exec_t:s0 4656056 Oct 12 18:47 /usr/sbin/php-fpm
[root@retoge ~]# ls -lZ /usr/lib/systemd/systemd
-rwxr-xr-x. 1 root root system_u:object_r:init_exec_t:s0 1528680 Nov 11 09:41 /usr/lib/systemd/systemd
[root@retoge ~]# restorecon -R -v /usr/lib
[root@retoge ~]# ls -lZ /usr/lib/systemd/systemd
-rwxr-xr-x. 1 root root system_u:object_r:init_exec_t:s0 1528680 Nov 11 09:41 /usr/lib/systemd/systemd
[root@retoge ~]#

特に問題はなさそう?

ぐぐった時に出てきた「Bug 1670386 – AVC denied httpd_execmem for php-fpm when php-opcache is installed」が近いかな?と httpdのhttpd_execmemをonに変えてみたけど、これだけではダメな模様(後述のaudit2allowの結果を見ると、これ自体は必要そうでした)

[root@retoge ~]# systemctl start php-fpm
Job for php-fpm.service failed because the control process exited with error code.
See "systemctl status php-fpm.service" and "journalctl -xe" for details.
[root@retoge ~]# systemctl restart httpd
[root@retoge ~]# systemctl start php-fpm
Job for php-fpm.service failed because the control process exited with error code.
See "systemctl status php-fpm.service" and "journalctl -xe" for details.
[root@retoge ~]#

今回はとりあえずphp-fpmが動けばいいか、ということで、問題となっているものを無視して起動できるようにしてしまうことにした。

まず、ausearchコマンドで関係するものをピックアップして、audit2allowで作成される予定のルールを確認する。

[root@retoge ~]# ausearch -m AVC |grep php| audit2allow


#============= httpd_t ==============

#!!!! This avc is allowed in the current policy
allow httpd_t http_port_t:tcp_socket name_connect;
allow httpd_t httpd_exec_t:file execmod;

#!!!! This avc can be allowed using the boolean 'httpd_unified'
allow httpd_t httpd_sys_content_t:dir write;

#!!!! This avc can be allowed using the boolean 'httpd_unified'
allow httpd_t httpd_sys_content_t:file write;
[root@retoge ~]#

これをモジュール化して組み込みます。

[root@retoge ~]# ausearch -m AVC |grep php| audit2allow -M php-fpm
******************** IMPORTANT ***********************
To make this policy package active, execute:

semodule -i php-fpm.pp

[root@retoge ~]# ls -l php-fpm*
-rw-r--r--. 1 root root 1594 Nov 18 09:51 php-fpm.pp
-rw-r--r--. 1 root root  597 Nov 18 09:51 php-fpm.te
[root@retoge ~]#

[root@retoge ~]# semodule -l |grep php
[root@retoge ~]# semodule -i php-fpm.pp
[root@retoge ~]# semodule -l |grep php
php-fpm
[root@retoge ~]#

php-fpmを起動してみます。

[root@retoge ~]# systemctl start php-fpm
[root@retoge ~]# systemctl status php-fpm
● php-fpm.service - The PHP FastCGI Process Manager
   Loaded: loaded (/usr/lib/systemd/system/php-fpm.service; disabled; vendor preset: disabled)
   Active: active (running) since Thu 2021-11-18 09:53:45 JST; 5s ago
 Main PID: 489019 (php-fpm)
   Status: "Ready to handle connections"
    Tasks: 6 (limit: 36876)
   Memory: 24.1M
   CGroup: /system.slice/php-fpm.service
           tq489019 php-fpm: master process (/etc/php-fpm.conf)
           tq489020 php-fpm: pool www
           tq489021 php-fpm: pool www
           tq489022 php-fpm: pool www
           tq489023 php-fpm: pool www
           mq489024 php-fpm: pool www

Nov 18 09:53:45 retoge systemd[1]: Starting The PHP FastCGI Process Manager...
Nov 18 09:53:45 retoge systemd[1]: Started The PHP FastCGI Process Manager.
[root@retoge ~]#

正常に起動が成功し、wordpressの動作も正常となりました。

Ubuntu 20.04でdrbdを使う場合の注意点

$
0
0

Ubuntu 20.04でdrbdを使おうとしたら、drbd-utilsのバージョンは9.11.0だが、drbd自体は8.4.11 といういまいちわけがわからない状態になっていた。

drbd 8ドキュメント」と「drbd 9ドキュメント」を見るとそれぞれ手順が違う。

とりあえずは「apt install drbd-utils」でインストールかな?と実行してみると普通に実行できる。

$ sudo -i
# apt install drbd-utils
Reading package lists... Done
Building dependency tree
Reading state information... Done
The following additional packages will be installed:
  guile-2.2-libs libgc1c2 libgsasl7 libidn11 libkyotocabinet16v5 libmailutils6
  libmysqlclient21 libntlm0 mailutils mailutils-common mysql-common postfix
  ssl-cert
Suggested packages:
  heartbeat mailutils-mh mailutils-doc procmail postfix-mysql postfix-pgsql
  postfix-ldap postfix-pcre postfix-lmdb postfix-sqlite sasl2-bin
  | dovecot-common resolvconf postfix-cdb postfix-doc openssl-blacklist
The following NEW packages will be installed:
  drbd-utils guile-2.2-libs libgc1c2 libgsasl7 libidn11 libkyotocabinet16v5
  libmailutils6 libmysqlclient21 libntlm0 mailutils mailutils-common
  mysql-common postfix ssl-cert
0 upgraded, 14 newly installed, 0 to remove and 0 not upgraded.
Need to get 9,579 kB of archives.
After this operation, 66.5 MB of additional disk space will be used.
Do you want to continue? [Y/n] y
<略>

postfixとdovecotもインストールされるため下記のダイアログも開くので注意が必要。

インストール後、パッケージを調べて見ると、drbd-utilsは9.11.0だけど、drbd-docは8.4というちぐはぐな状態であることに気がつく。

root@ubuntu143:~# apt search drbd
Sorting... Done
Full Text Search... Done
collectd-core/focal 5.9.2.g-1ubuntu5 amd64
  statistics collection and monitoring daemon (core system)

drbd-doc/focal 8.4~20151102-1 all
  RAID 1 over TCP/IP for Linux (user documentation)

drbd-utils/focal,now 9.11.0-1build1 amd64 [installed]
  RAID 1 over TCP/IP for Linux (user utilities)

nagios-plugins-contrib/focal 25.20191015+1ubuntu1 amd64
  Plugins for nagios compatible monitoring systems

prometheus-hacluster-exporter/focal 0.4.0-2 amd64
  Prometheus exporter for HA cluster services

root@ubuntu143:~#

動作させてみると /proc/drbd が返すバージョンは 「version: 8.4.11 (api:1/proto:86-101)」だった。

root@ubuntu143:~# cat /proc/drbd
version: 8.4.11 (api:1/proto:86-101)
srcversion: FC3433D849E3B88C1E7B55C
 0: cs:Connected ro:Primary/Secondary ds:UpToDate/UpToDate C r-----
    ns:6276 nr:0 dw:42864576 dr:5041 al:328 bm:0 lo:0 pe:0 ua:0 ap:0 ep:1 wo:f oos:0
root@ubuntu143:~#

drbdは9.0からauto promoteという機能が追加されたので、それを使いたい場合に、8.4だと困る、ということになる。

このauto promoteは、両ノードが再起動した際に最初にdrbdデバイスにアクセスしてきたノードを自動的にprimaryに設定してくれる、という機能である。(8.xまでは両方ともSecondaryのままで、手動でprimaryに設定する必要があった)

というわけで、drbd9を使いたい場合は、PPAレポジトリを追加してlinbitが提供するdrbd9をインストールする必要がある。

ドキュメントにはに書かれているPPAレポジトリ情報は誤りがあり、正しくは「https://launchpad.net/~linbit/+archive/ubuntu/linbit-drbd9-stack」だった。

ここにあるように「add-apt-repository ppa:linbit/linbit-drbd9-stack」を実行してPPAレポジトリを追加する。

root@ubuntu143:~# add-apt-repository ppa:linbit/linbit-drbd9-stack
 This PPA contains DRBD9, drbd-utils, LINSTOR (client, python API, server).

This differs from official, production grade LINBIT repositories in several ways, including:
- We push RCs immediately to the PPA
- We don't push hotfixes, these usually have to wait until the next RC/release
- We only keep 2 LTS versions up to date (Bionic and Focal, but not Xenial)

For support and access to official repositories see:
https://www.linbit.com or write an email to: sales AT linbit.com
 More info: https://launchpad.net/~linbit/+archive/ubuntu/linbit-drbd9-stack
Press [ENTER] to continue or Ctrl-c to cancel adding it.

Hit:1 http://jp.archive.ubuntu.com/ubuntu focal InRelease
Get:2 http://jp.archive.ubuntu.com/ubuntu focal-updates InRelease [114 kB]
Get:3 http://jp.archive.ubuntu.com/ubuntu focal-backports InRelease [101 kB]
Get:4 http://jp.archive.ubuntu.com/ubuntu focal-security InRelease [114 kB]
Get:5 http://ppa.launchpad.net/linbit/linbit-drbd9-stack/ubuntu focal InRelease [24.4 kB]
Get:6 http://ppa.launchpad.net/linbit/linbit-drbd9-stack/ubuntu focal/main amd64 Packages [2,344 B]
Get:7 http://ppa.launchpad.net/linbit/linbit-drbd9-stack/ubuntu focal/main Translation-en [1,308 B]
Fetched 356 kB in 3s (137 kB/s)
Reading package lists... Done
root@ubuntu143:~#

で・・・linbit提供のdrbdはdkmsモジュールとして提供されるため「apt install drbd-utils drbd-dkms」を実行してインストールすることになる。

今回のテスト環境ではdrbd8が既にインストールされていたので、最初に「apt update;apt upgrade」を実行してapt-utilsのバージョンアップを行った。

root@ubuntu143:~# apt update
Hit:1 http://jp.archive.ubuntu.com/ubuntu focal InRelease
Get:2 http://jp.archive.ubuntu.com/ubuntu focal-updates InRelease [114 kB]
Get:3 http://jp.archive.ubuntu.com/ubuntu focal-backports InRelease [101 kB]
Get:4 http://jp.archive.ubuntu.com/ubuntu focal-security InRelease [114 kB]
Hit:5 http://ppa.launchpad.net/linbit/linbit-drbd9-stack/ubuntu focal InRelease
Fetched 328 kB in 1s (538 kB/s)
Reading package lists... Done
Building dependency tree
Reading state information... Done
1 package can be upgraded. Run 'apt list --upgradable' to see it.
root@ubuntu143:~# apt list --upgradable
Listing... Done
drbd-utils/focal 9.19.1-1ppa1~focal1 amd64 [upgradable from: 9.11.0-1build1]
N: There is 1 additional version. Please use the '-a' switch to see it
root@ubuntu143:~# apt upgrade
Reading package lists... Done
Building dependency tree
Reading state information... Done
Calculating upgrade... Done
The following packages will be upgraded:
  drbd-utils
1 upgraded, 0 newly installed, 0 to remove and 0 not upgraded.
Need to get 720 kB of archives.
After this operation, 75.8 kB of additional disk space will be used.
Do you want to continue? [Y/n] y
Get:1 http://ppa.launchpad.net/linbit/linbit-drbd9-stack/ubuntu focal/main amd64 drbd-utils amd64 9.19.1-1ppa1~focal1 [720 kB]
Fetched 720 kB in 3s (214 kB/s)
Preconfiguring packages ...
(Reading database ... 72754 files and directories currently installed.)
Preparing to unpack .../drbd-utils_9.19.1-1ppa1~focal1_amd64.deb ...
Unpacking drbd-utils (9.19.1-1ppa1~focal1) over (9.11.0-1build1) ...
Setting up drbd-utils (9.19.1-1ppa1~focal1) ...

Configuration file '/etc/drbd.d/global_common.conf'
 ==> Modified (by you or by a script) since installation.
 ==> Package distributor has shipped an updated version.
   What would you like to do about it ?  Your options are:
    Y or I  : install the package maintainer's version
    N or O  : keep your currently-installed version
      D     : show the differences between the versions
      Z     : start a shell to examine the situation
 The default action is to keep your current version.
*** global_common.conf (Y/I/N/O/D/Z) [default=N] ? y
Installing new version of config file /etc/drbd.d/global_common.conf ...
Installing new version of config file /etc/init.d/drbd ...
Processing triggers for man-db (2.9.1-1) ...
Processing triggers for systemd (245.4-4ubuntu3.13) ...
root@ubuntu143:~#

次に、「apt install drbd-dkms」でdrbd本体をインストールした。

root@ubuntu143:~# apt install drbd-dkms
Reading package lists... Done
Building dependency tree
Reading state information... Done
The following additional packages will be installed:
  autoconf automake autopoint autotools-dev binutils binutils-common
  binutils-x86-64-linux-gnu build-essential cpp cpp-9 dctrl-tools debhelper
  dh-autoreconf dh-strip-nondeterminism dkms dpkg-dev dwz fakeroot g++ g++-9
  gcc gcc-9 gcc-9-base gettext intltool-debian libalgorithm-diff-perl
  libalgorithm-diff-xs-perl libalgorithm-merge-perl libarchive-cpio-perl
  libarchive-zip-perl libasan5 libatomic1 libbinutils libc-dev-bin libc6-dev
  libcc1-0 libcroco3 libcrypt-dev libctf-nobfd0 libctf0 libdebhelper-perl
  libdpkg-perl libfakeroot libfile-fcntllock-perl
  libfile-stripnondeterminism-perl libgcc-9-dev libgomp1 libisl22 libitm1
  liblsan0 libltdl-dev libmail-sendmail-perl libmpc3 libquadmath0
  libstdc++-9-dev libsub-override-perl libsys-hostname-long-perl libtool
  libtsan0 libubsan1 linux-libc-dev m4 make manpages-dev po-debconf
Suggested packages:
  autoconf-archive gnu-standards autoconf-doc binutils-doc cpp-doc
  gcc-9-locales debtags dh-make menu debian-keyring g++-multilib
  g++-9-multilib gcc-9-doc gcc-multilib flex bison gdb gcc-doc gcc-9-multilib
  gettext-doc libasprintf-dev libgettextpo-dev glibc-doc bzr libtool-doc
  libstdc++-9-doc gfortran | fortran95-compiler gcj-jdk m4-doc make-doc
  libmail-box-perl
The following NEW packages will be installed:
  autoconf automake autopoint autotools-dev binutils binutils-common
  binutils-x86-64-linux-gnu build-essential cpp cpp-9 dctrl-tools debhelper
  dh-autoreconf dh-strip-nondeterminism dkms dpkg-dev drbd-dkms dwz fakeroot
  g++ g++-9 gcc gcc-9 gcc-9-base gettext intltool-debian
  libalgorithm-diff-perl libalgorithm-diff-xs-perl libalgorithm-merge-perl
  libarchive-cpio-perl libarchive-zip-perl libasan5 libatomic1 libbinutils
  libc-dev-bin libc6-dev libcc1-0 libcroco3 libcrypt-dev libctf-nobfd0 libctf0
  libdebhelper-perl libdpkg-perl libfakeroot libfile-fcntllock-perl
  libfile-stripnondeterminism-perl libgcc-9-dev libgomp1 libisl22 libitm1
  liblsan0 libltdl-dev libmail-sendmail-perl libmpc3 libquadmath0
  libstdc++-9-dev libsub-override-perl libsys-hostname-long-perl libtool
  libtsan0 libubsan1 linux-libc-dev m4 make manpages-dev po-debconf
0 upgraded, 66 newly installed, 0 to remove and 0 not upgraded.
Need to get 47.8 MB of archives.
After this operation, 208 MB of additional disk space will be used.
Do you want to continue? [Y/n] y
<略>
drbd.ko:
Running module version sanity check.
 - Original module
   - No original module exists within this kernel
 - Installation
   - Installing to /lib/modules/5.4.0-90-generic/updates/dkms/

drbd_transport_tcp.ko:
Running module version sanity check.
 - Original module
   - No original module exists within this kernel
 - Installation
   - Installing to /lib/modules/5.4.0-90-generic/updates/dkms/

depmod..........

DKMS: install completed.
Processing triggers for install-info (6.7.0.dfsg.2-5) ...
Processing triggers for libc-bin (2.31-0ubuntu9.2) ...
Processing triggers for man-db (2.9.1-1) ...
root@ubuntu143:~#

これで再起動

すると下記の様にdrbdのバージョンが「version: 9.1.4 (api:2/proto:110-121)」となった。

root@ubuntu143:~# cat /proc/drbd
version: 9.1.4 (api:2/proto:110-121)
GIT-hash: e4de25c3a65811b0fa4733b1c2a000ee322f5cfa build by root@ubuntu143, 2021-11-24 07:10:11
Transports (api:17): tcp (9.1.4)
root@ubuntu143:~#

この状態でdrbd関連パッケージの状態を確認する下記の様になっていた。

root@ubuntu143:~# apt search drbd
Sorting... Done
Full Text Search... Done
collectd-core/focal 5.9.2.g-1ubuntu5 amd64
  statistics collection and monitoring daemon (core system)

drbd-dkms/focal,now 9.1.4-1ppa1~focal1 all [installed]
  RAID 1 over TCP/IP for Linux module source

drbd-doc/focal 8.4~20151102-1 all
  RAID 1 over TCP/IP for Linux (user documentation)

drbd-module-source/focal 9.1.4-1ppa1~focal1 all
  RAID 1 over TCP/IP for Linux module source

drbd-reactor/focal 0.5.0-1ppa1~focal1 amd64
  Monitors DRBD resources via plugins.

drbd-utils/focal,now 9.19.1-1ppa1~focal1 amd64 [installed]
  RAID 1 over TCP/IP for Linux (user utilities)

drbd8-utils/focal 2:9.19.1-1ppa1~focal1 amd64
  transitional dummy package

linstor-common/focal 1.16.0-1ppa1~focal1 all
  DRBD distributed resource management utility

linstor-controller/focal 1.16.0-1ppa1~focal1 all
  DRBD distributed resource management utility

linstor-satellite/focal 1.16.0-1ppa1~focal1 all
  DRBD distributed resource management utility

nagios-plugins-contrib/focal 25.20191015+1ubuntu1 amd64
  Plugins for nagios compatible monitoring systems

prometheus-hacluster-exporter/focal 0.4.0-2 amd64
  Prometheus exporter for HA cluster services

root@ubuntu143:~#


ADAPTEX R90を使って他社用コントローラでPS4を動かす

$
0
0

PS4 Proを使って原神をやっているのだが、1年もやっているとDualshockの動作が怪しくなってきた。

そこで新しいコントローラを探してみたのだが、PS4用とうたって販売しているやつが怪しいものばかりなのに嫌気がさした。

1年前にPS5風のPS4コントローラなんてものを買ってみたりもしたのだが、1ヶ月ぐらいでボタンがおかしくなり使用不可に。それを考えると似たような価格帯のPS4用は期待できないな、というのもあった。

さて、そんな探している中で、BIGBIG WON RAINBOWという商品を発見した。

説明書きを読むと別売りの変換アダプター ADAPEX R90とセットにするとPS4でも使えるとのこと

なお、このメーカでは他にBluetooth接続の変換アダプターADAPEX R100ADAPTEX R100 Proというのも扱っている。

有線のR90にするか、無線のR100/R100 Proにするか悩んだのだが、無線だと他の機種につなげるつなげなおす時にペアリングをやりなおさないとならないのが面倒だなぁ、というのがあったので、今回はR90とRAINBOWコントローラをセットで購入してみた。

大阪の倉庫から1日で東京までお届け完了

中身はこんな感じでした。

長いmicroUSBケーブルが添付されていました。

さて、PS4に繋いで見ます。

PS4上のボタン動作は、純正DualShockのボタン配置に相当する場所にあるものがその動作をする、という感じでした。

ちなみに初期設定ではこんな感じで光ります。

光り方は背面中央にある「Fn」ボタンを2連続で押すとモードが変更され、何回かモード変更すると消灯モードに切り替わります。

しばらく原神で遊んで見ましたが、ちょっと重く感じる、というのと、コントローラにオーディオ出力っぽい端子があるけど動かない、という点以外は特に問題無く使用できています。

背面にあるマクロ登録可能なボタンについてはまだ使って見ていません。

さて、変換アダプターADAPTEX R90の対応表を見ると任天堂スイッチのProコンがサポート対象に入っています。

そんなわけで、PS4 ProにR90経由でProコンを接続してみました。

こちらもトクに問題なく動作していました。

ホームボタンはPSボタンとして動作していました。

なお、任天堂純正ではないスイッチ用コントローラやWindows汎用コントローラをつなげてみましたが、それらは無反応でした。

R90 firmwareのバージョンアップとかできないのかなぁ?

RAINBOWコントローラ自体はBluetooth接続が可能です。

専用アプリBIGBIG WONからfirmwareアップデートや光り方の制御が行えます。

Bluetooth接続するとアプリ内に「Rainbow」コントローラが登録されます。

「新築配置」から設定可能です。

まずは光り方の制御設定

ボタン感度や振動の強さ制御

また、ゲーム内設定でアナログジョイスティックの操作反転ができない場合にコントローラ側で対応できるような設定もあります。

また、firmwareアップデートに関する項目もあります。

今回届いたRAINBOWコントローラのfirmwareは4257のようです。

過去のバージョン一覧を見てみると2021/11/15付け3843から2週間で4257ってめっちゃバージョンアップしすぎでは?

まあ、更新をしっかりやってくれそうなのは安心な点ですね。

さて、しばらく使って見ますかね

NetAppで電源電圧を確認する方法

$
0
0

NetAppを稼働させていたら電源電圧の警告が出ていたので、その確認手法を調べた。

ONTAP OS側からだと「system node environment sensors show」で現在値のみが確認出来た。

ただ、上記だと各部センサーの情報が全て含まれてしまうので、電源電圧だけを見るのであれば「system node environment sensors show -name *VIN*」と指定することで入力電圧のみを見ることが出来る。

fas8300::> system node environment sensors show -name *VIN*
Node Sensor                 State Value/Units Crit-Low Warn-Low Warn-Hi Crit-Hi
---- --------------------- ------ ----------- -------- -------- ------- -------
fas8300-01
     PSU1 VIN              normal
                                    99840 mV     90480    93600  261040  263120
     PSU2 VIN              normal
                                    94640 mV     90480    93600  261040  263120
fas8300-02
     PSU1 VIN              normal
                                    99840 mV     90480    93600  261040  263120
     PSU2 VIN              normal
                                    94640 mV     90480    93600  261040  263120
4 entries were displayed.

fas8300::>

「Value/Units」が現在値で、それ以外が注意/警告を発令する電圧設定となる。

これまでに電源電圧警報が発令された時に何Vだったのかを確認するには、Service Processor/BMC側にログインして調べる必要があった。

「system log sel」で表示されるIPMIログを見て確認する。

BMC fas8300-01> system log sel
   1 | 11/09/2021 | 09:38:39 | System Firmware Progress | Secondary CPU Initialization | Asserted
   2 | 11/09/2021 | 09:38:39 | System Firmware Progress | USB resource configuration | Asserted
   3 | 11/09/2021 | 09:38:41 | System Firmware Progress | PCI resource configuration | Asserted
   4 | 11/09/2021 | 09:38:41 | System Firmware Progress | Video initialization | Asserted
   5 | 11/09/2021 | 09:38:41 | System Firmware Progress | Keyboard controller initialization | Asserted
   6 | 11/09/2021 | 09:38:42 | System Firmware Progress | Hard-disk initialization | Asserted
   7 | 11/09/2021 | 09:38:50 | System Firmware Progress | Hard-disk initialization | Asserted
   8 | 11/09/2021 | 09:39:01 | System Event |  | Asserted
   9 | 11/09/2021 | 09:39:20 | Voltage #0x50 | Lower Non-critical going low
   a | 11/09/2021 | 09:39:24 | Voltage #0x5a | Lower Non-critical going low
   b | 11/09/2021 | 09:40:29 | Voltage #0x50 | Lower Non-critical going low
   c | 11/09/2021 | 09:40:29 | Voltage #0x5a | Lower Non-critical going low
   d | 11/09/2021 | 09:41:02 | System Event #0xff | Timestamp Clock Sync | Asserted
   e | 11/09/2021 | 09:41:02 | System Event #0xff | Timestamp Clock Sync | Asserted
   f | 11/09/2021 | 10:41:48 | Voltage #0x50 | Lower Non-critical going low
<略>
 b97 | 11/30/2021 | 23:45:25 | Voltage #0x5a | Lower Non-critical going low
 b98 | 11/30/2021 | 23:46:33 | Voltage #0x5a | Lower Non-critical going low
 b99 | 11/30/2021 | 23:46:46 | Voltage #0x5a | Lower Non-critical going low

BMC fas8300-01>

上記の「Voltage #0x50 | Lower Non-critical going low」というのが16進数表記の電圧となる。

0x50=80V、0x5a=90Vとなる。

さすがにAC 80Vは低すぎでしょ!!というわけで、電源経路確認が実施されましたとさ

ONTAPで未接続のイーサポートを無効化する手法

$
0
0

NetApp ONTAPのWeb管理画面 ONTAP System Managerは、未使用でネットワークケーブルを接続していないポートがあると、オフラインになってるポートがあるよ、的な警告を表示する。

System Managerからだと簡単にネットワークポートの無効化が設定できる

無効化したいポートを選択して、「無効化」

続行します。

選択したポートのグラフィックが灰色に変化します。

さて、この操作、コマンドで行うにはどうすればいいのか?

まず、状況については「network port show」で確認出来ます。

fas8300::> network port show

Node: fas8300-01
                                                  Speed(Mbps) Health
Port      IPspace      Broadcast Domain Link MTU  Admin/Oper  Status
--------- ------------ ---------------- ---- ---- ----------- --------
a0a       Default      -                up   9000     -/-     healthy
a0a-1000  Default      Storage          up   9000     -/-     healthy
e0M       Default      Default          up   1500  auto/1000  healthy
e0c       Cluster      Cluster          up   9000 100000/100000 healthy
e0d       Cluster      Cluster          up   9000 100000/100000 healthy
e0e       Default      -                up   9000  auto/25000 healthy
e0f       Default      -                up   9000  auto/25000 healthy
e0g       Default      -                up   9000  auto/25000 healthy
e0h       Default      -                down 9000  auto/-     -

Node: fas8300-02
                                                  Speed(Mbps) Health
Port      IPspace      Broadcast Domain Link MTU  Admin/Oper  Status
--------- ------------ ---------------- ---- ---- ----------- --------
a0a       Default      -                up   9000     -/-     healthy
a0a-1000  Default      Storage          up   9000     -/-     healthy
e0M       Default      Default          up   1500  auto/1000  healthy
e0c       Cluster      Cluster          up   9000  auto/100000 healthy
e0d       Cluster      Cluster          up   9000  auto/100000 healthy
e0e       Default      -                up   9000  auto/25000 healthy
e0f       Default      -                up   9000  auto/25000 healthy
e0g       Default      -                up   9000  auto/25000 healthy
e0h       Default      -                up   9000  auto/25000 healthy
18 entries were displayed.

fas8300::>

しかし、network port modifyで指定できるオプションには、link up/downに関する設定がなさそう・・・

fas8300::> network port modify -node fas8300-01 -port e0h -?
  [ -mtu <integer> ]                                            MTU
  [ -autonegotiate-admin {true|false} ]                         Auto-Negotiation Administrative
  [ -duplex-admin {auto|half|full} ]                            Duplex Mode Administrative
  [ -speed-admin {auto|10|100|1000|10000|100000|40000|25000} ]  Speed Administrative
  [ -flowcontrol-admin {none|receive|send|full} ]               Flow Control Administrative
  [ -ipspace <IPspace> ]                                        IPspace Name

fas8300::>

マニュアルの「network port modify」を確認してみると下記の記述がある。

[-up-admin {true|false}] – Up Administrative (privilege: advanced)
The administrative state of the port. If set to true, the port is used if it is operational. If set to false, the port is configured down.

標準の管理CLIではなく、advanced以上の権限であれば実行できる、とのこと。

fas8300::> set advanced

Warning: These advanced commands are potentially dangerous; use them only when directed to do so by NetApp
         personnel.
Do you want to continue? {y|n}: y

fas8300::*>

advancedモードに切り替えてから、再度オプション一覧を確認

fas8300::*> network port modify -node fas8300-01 -port e0h -?
  [ -mtu <integer> ]                                            MTU
  [ -autonegotiate-admin {true|false} ]                         Auto-Negotiation Administrative
  [ -duplex-admin {auto|half|full} ]                            Duplex Mode Administrative
  [ -speed-admin {auto|10|100|1000|10000|100000|40000|25000} ]  Speed Administrative
  [ -flowcontrol-admin {none|receive|send|full} ]               Flow Control Administrative
  [ -up-admin {true|false} ]                                    *Up Administrative
  [ -ipspace <IPspace> ]                                        IPspace Name
  [ -ignore-health-status {true|false} ]                        *Ignore Port Health Status

fas8300::*>

設定出来る項目に現れました。

fas8300::*> network port modify -node fas8300-01 -port e0h -up-admin true

fas8300::*>

設定が反映されたかを確認します

fas8300::*> network port show

Node: fas8300-01
                                                                       Ignore
                                                  Speed(Mbps) Health   Health
Port      IPspace      Broadcast Domain Link MTU  Admin/Oper  Status   Status
--------- ------------ ---------------- ---- ---- ----------- -------- ------
a0a       Default      -                up   9000     -/-     healthy  false
a0a-1000  Default      Storage          up   9000     -/-     healthy  false
e0M       Default      Default          up   1500  auto/1000  healthy  false
e0c       Cluster      Cluster          up   9000 100000/100000 healthy false
e0d       Cluster      Cluster          up   9000 100000/100000 healthy false
e0e       Default      -                up   9000  auto/25000 healthy  false
e0f       Default      -                up   9000  auto/25000 healthy  false
e0g       Default      -                up   9000  auto/25000 healthy  false
e0h       Default      -                up   9000  auto/25000 healthy  false

Node: fas8300-02
                                                                       Ignore
                                                  Speed(Mbps) Health   Health
Port      IPspace      Broadcast Domain Link MTU  Admin/Oper  Status   Status
--------- ------------ ---------------- ---- ---- ----------- -------- ------
a0a       Default      -                up   9000     -/-     healthy  false
a0a-1000  Default      Storage          up   9000     -/-     healthy  false
e0M       Default      Default          up   1500  auto/1000  healthy  false
e0c       Cluster      Cluster          up   9000  auto/100000 healthy false
e0d       Cluster      Cluster          up   9000  auto/100000 healthy false
e0e       Default      -                up   9000  auto/25000 healthy  false
e0f       Default      -                up   9000  auto/25000 healthy  false
e0g       Default      -                up   9000  auto/25000 healthy  false
e0h       Default      -                up   9000  auto/25000 healthy  false
18 entries were displayed.

fas8300::*>

全てのポートがupになりました。

System Managerの方でも表示がupに戻ったかを確認できました。

Web GUIだと簡単に設定変更できるものが、コマンドだとadvanced権限必要だった、というのは驚きでした。

Ubuntu 20.04 でリンク速度固定をする

$
0
0

Ubuntu 20.04.3 Serverでリンク速度の固定をしようと思ったのだが、公式に類するドキュメントが発見できなかった。

手動でやる場合は ethtoolコマンド、というのは分かるのだが、起動時に自動設定する方法が分からない。

Desktop版の設定

Ubuntu 20.04 DesktopではNetworkManagerがネットワークの設定を担当しており、 /etc/NetworkManager ディレクトリ内に関連する設定ファイルがあった。

具体的には /etc/NetworkManager/system-connections/接続名.nmconnection というファイルが作成されていた。

そのファイル内の[ethernet]セクションに下記の記載をすることで設定された。

[ethernet]
mac-address-blacklist=
speed=100
duplex=full

Server版の場合

Ubuntu 20.04 Server版では systemd-networkd と netplanがネットワーク設定を担当している。

IPアドレス設定については netplan側で行い、 /etc/netplan/99_config.yaml などで設定する。

リンク速度固定についてはsystemd側で設定を行うようだった。

今回直接のヒントになった情報はこちら:Set network interface speed with systemd-networkd

上記サイトでは /etc/systemd/networkd/internet.link というファイルを作って設定している。

実際には拡張子「.link」が重要となっていて、NICの初期認識の時に読み込むファイル群ということになっている。

私の場合は /etc/systemd/network/99-default.link というファイル名で作成した。

複数のNICがあり、それぞれで異なる設定を行いたい場合は /etc/systemd/network/99-nic1.link と /etc/systemd/network/99-nic2.link とMatch条件ごとにファイルを分けて設定する形になる。

ドキュメント: systemd.link

[Match]セクションで条件に該当するデバイスを定義し、[Link]セクションで値を設定する、という作りになっている。

たとえばドライバ e1000e のNIC全てに同じ設定を入れる場合は下記の様になる。

[Match]
Driver=e1000e

[Link]
AutoNegotiation=no
BitsPerSecond=100M
Duplex=full

特定のMACアドレスに対してのみ適用したい場合は下記の様になる。

[Match]
PermanentMACAddress=00:0c:29:9c:7e:14

[Link]
AutoNegotiation=no
BitsPerSecond=1G
Duplex=half

なお、「MACAddress=~」で設定もできるが、Linuxでは物理的なMACアドレスに対して上書きで別途MACAddress値を設定してしまうことができる。

特にbonding設定時は必ずMACAddress値が変わってしまうため、物理的なデバイスについているPermanentMACAddressの値を使う必要がある。

bondingデバイス設定時などは「ip a s」で確認できるMACアドレスではなく、dmesgなどに登場する起動直後に認識しているMACアドレスを使う必要がある。

root@ubuntu:~# dmesg|grep eth
[    1.718483] e1000e 0000:03:00.0 eth0: (PCI Express:2.5GT/s:Width x1) 00:0c:29:9c:7e:0a
[    1.718709] e1000e 0000:03:00.0 eth0: Intel(R) PRO/1000 Network Connection
[    1.718927] e1000e 0000:03:00.0 eth0: MAC: 3, PHY: 8, PBA No: 000000-000
[    1.825725] e1000e 0000:0b:00.0 eth1: (PCI Express:2.5GT/s:Width x1) 00:0c:29:9c:7e:14
[    1.826001] e1000e 0000:0b:00.0 eth1: Intel(R) PRO/1000 Network Connection
[    1.826314] e1000e 0000:0b:00.0 eth1: MAC: 3, PHY: 8, PBA No: 000000-000
[    1.829127] e1000e 0000:03:00.0 ens160: renamed from eth0
[    1.843927] e1000e 0000:0b:00.0 ens192: renamed from eth1
root@ubuntu:~#

複数のMACアドレスを指定する場合は下記の様にスペースを空けて列挙する。

[Match]
PermanentMACAddress=00:0c:29:9c:7e:14 00:0c:29:9c:7e:0a

[Link]
AutoNegotiation=no
BitsPerSecond=100M
Duplex=full

NICのデバイス名 ens192などを指定できないかチャレンジしたのですが、「Name=」や「OriginalName=」を使用してみましたが動作しませんでした。

設定値の反映については、確認した限りではauto negotiationのon/off切り替えについては、再起動が必要でした。

auto-negotiation offになった後の、リンク速度変更については、設定記載後に「udevadm test-builtin net_setup_link /sys/class/net/デバイス名」を実行することで反映されました。

root@ubuntu:~# udevadm test-builtin net_setup_link /sys/class/net/ens160
Load module index
Parsed configuration file /etc/systemd/network/99-default.link
Parsed configuration file /usr/lib/systemd/network/73-usb-net-by-mac.link
Created link configuration context.
ID_NET_DRIVER=e1000e
ens160: Failed to get ACTION= property: No such file or directory
Using default interface naming scheme 'v245'.
ID_NET_LINK_FILE=/etc/systemd/network/99-default.link
Unload module index
Unloaded link configuration context.
root@ubuntu:~#

リンク速度が変わったことが確認できます。

root@ubuntu:~# dmesg|grep ens160
[ 5510.551597] e1000e: ens160 NIC Link is Up 100 Mbps Full Duplex, Flow Control: None
[ 5510.551771] e1000e 0000:03:00.0 ens160: 10/100 speed: disabling TSO
root@ubuntu:~#

失敗編

/etc/networkd-dispatcher/routable.d にスクリプトを配置して、 ethtoolを実行してTSO offさせる、的な記述を発見。(How to execute post-up scripts with netplan)

/etc/networkd-dispatcher/routable.d/990-speed を作成し下記の内容を書いてみたところ、なぜか1秒間隔でスクリプトが実行され続けてしまった・・・なぜ?

#!/bin/bash

/usr/sbin/ethtool -s ens192 autoneg off speed 100 duplex full
exit 0

失敗ではないものの、実は一番最初に見つけた「How to permanently disable TSO & GSO in Ubuntu 18.04」で/etc/systemd/network/01-tso-and-gso.link ファイルを作って下記を記述

[Match]
# Set a match condition appropriate for your use case
Name=*

[Link]
TCPSegmentationOffload=false
GenericSegmentationOffload=false

と書かれていたのがもっとも正解に近かったという・・・

CentOS7やUbuntu 20.04などでコンソール解像度を低くする

$
0
0

RHEL/CentOS6以降やUbuntu 18.04(?)以降など、最近にLinuxでは起動時に接続しているディスプレイの解像度を認識し、高解像度で表示しようとする。

これは Kernel Mode Setting (KMS) (kernel.orgの説明 / archlinux wikiの説明)の機能により実現されている。

しかし、複数台のサーバを設定する場合、モニタが1台しかないのでつなぎ替えて設定しようとすると、起動時にモニタがつながっていたサーバだけ解像度が高くなってしまう、という弊害がある。

この問題は、DELLサーバに搭載されるiDRAC機能によるリモートコンソール接続の時にも発生してしまい、起動時に物理モニタが接続されているサーバだけブラウザ上のコンソール表示が高解像度で表示されます。

これを避けるには強制的に解像度を指定する必要があります。

参考にした情報源

RedHat KB: RHEL 6 および RHEL 7 で VGA コンソールのテキスト解像度を 80×25 に設定する方法
archlinux wiki: GRUB/ヒントとテクニック の「3.1 フレームバッファの解像度を設定する
grubマニュアル: 6.1 Simple configuration handling
centos.org forum: How to change Grub menu resolution?

Ubuntu 20.04 Serverの場合

インストール直後は、起動直後に下記のようなgrubメニューが表示されない設定となっています。まずは、grubメニューが表示されるよう設定変更してください。(なお、設定手法については後述の /etc/default/grub の所に書いてあります)

grubメニューが表示されるようになったら、上記で止めて「c」を入力し、コマンドラインモードに変更します。

ここで「videoinfo」と入力します。

そうすると対応できる表示モードの一覧が出力されますが、モードが多い場合はスクロールしてしまい、全部を見ることができない場合があります。

そのような場合は「set pager=1」と入力し、そのあとに「videoinfo」を実行します。

なお、日本語キーボード利用時、= は、「^ へ ~」キー(通常の=の右隣)で入力出来ます。

解像度指定は「800x600x32」といったような形で行います。

実際にそれが使用できるかは「videotest 800x600x32」と実行します。

そうすると、下記の様に表示されます。これが読める状態であれば問題ありません。

このテストは終了する手法がないため、強制再起動します。(ctrl+alt+deleteなどで)

設定する解像度が決まったら普通にUbuntuを起動します。

設定するファイルは /etc/default/grub です。

Ubuntu 20.04をvSphere上でインストールした場合の初期値では下記の様になっていました。

# If you change this file, run 'update-grub' afterwards to update
# /boot/grub/grub.cfg.
# For full documentation of the options in this file, see:
#   info -f grub -n 'Simple configuration'

GRUB_DEFAULT=0
GRUB_TIMEOUT_STYLE=hidden
GRUB_TIMEOUT=0
GRUB_DISTRIBUTOR=`lsb_release -i -s 2> /dev/null || echo Debian`
GRUB_CMDLINE_LINUX_DEFAULT="maybe-ubiquity"
GRUB_CMDLINE_LINUX=""

# Uncomment to enable BadRAM filtering, modify to suit your needs
# This works with Linux (no patch required) and with any kernel that obtains
# the memory map information from GRUB (GNU Mach, kernel of FreeBSD ...)
#GRUB_BADRAM="0x01234567,0xfefefefe,0x89abcdef,0xefefefef"

# Uncomment to disable graphical terminal (grub-pc only)
#GRUB_TERMINAL=console

# The resolution used on graphical terminal
# note that you can use only modes which your graphic card supports via VBE
# you can see them in real GRUB with the command `vbeinfo'
#GRUB_GFXMODE=640x480

# Uncomment if you don't want GRUB to pass "root=UUID=xxx" parameter to Linux
#GRUB_DISABLE_LINUX_UUID=true

# Uncomment to disable generation of recovery mode menu entries
#GRUB_DISABLE_RECOVERY="true"

# Uncomment to get a beep at grub start
#GRUB_INIT_TUNE="480 440 1"

grubメニューを表示して10秒まつ設定(“GRUB_TIMEOUT_STYLE=menu”と”GRUB_TIMEOUT=10” ) を入れて

そこに、コンソール解像度を設定するための以下の設定を入れます。

grubでの解像度を指定するための「GRUB_GFXMODE=800×600」
grubでの設定内容をkernel起動後も維持するための「GRUB_GFXPAYLOAD_LINUX=keep」と、「GRUB_CMDLINE_LINUX_DEFAULT=」行への「nomodeset」追加

これを行った後の /etc/default/grub の内容は下記の様になります。

# If you change this file, run 'update-grub' afterwards to update
# /boot/grub/grub.cfg.
# For full documentation of the options in this file, see:
#   info -f grub -n 'Simple configuration'

GRUB_DEFAULT=0
GRUB_TIMEOUT_STYLE=menu
GRUB_TIMEOUT=10
GRUB_DISTRIBUTOR=`lsb_release -i -s 2> /dev/null || echo Debian`
GRUB_CMDLINE_LINUX_DEFAULT="maybe-ubiquity nomodeset"
GRUB_CMDLINE_LINUX=""

# Uncomment to enable BadRAM filtering, modify to suit your needs
# This works with Linux (no patch required) and with any kernel that obtains
# the memory map information from GRUB (GNU Mach, kernel of FreeBSD ...)
#GRUB_BADRAM="0x01234567,0xfefefefe,0x89abcdef,0xefefefef"

# Uncomment to disable graphical terminal (grub-pc only)
#GRUB_TERMINAL=console

# The resolution used on graphical terminal
# note that you can use only modes which your graphic card supports via VBE
# you can see them in real GRUB with the command `vbeinfo'
#GRUB_GFXMODE=640x480
GRUB_GFXMODE=800x600
GRUB_GFXPAYLOAD_LINUX=keep

# Uncomment if you don't want GRUB to pass "root=UUID=xxx" parameter to Linux
#GRUB_DISABLE_LINUX_UUID=true

# Uncomment to disable generation of recovery mode menu entries
#GRUB_DISABLE_RECOVERY="true"

# Uncomment to get a beep at grub start
#GRUB_INIT_TUNE="480 440 1"

書き換えたらgrub.cfgを生成するため「sudo update-grub2」を実行します。

instadmin@ubuntu:~$ sudo update-grub2
Sourcing file `/etc/default/grub'
Sourcing file `/etc/default/grub.d/init-select.cfg'
Generating grub configuration file ...
Found linux image: /boot/vmlinuz-5.4.0-91-generic
Found initrd image: /boot/initrd.img-5.4.0-91-generic
done
instadmin@ubuntu:~$

設定後、再起動して解像度が指定通りになっていることを確認します。

CentOS7の場合

RedHatのKBに記載があります:「RHEL 6 および RHEL 7 で VGA コンソールのテキスト解像度を 80×25 に設定する方法

上記KBでは640×480に設定していますが、他の解像度が指定できないものかCentOS7でいろいろ試してみましたが出来ませんでした。

設定は /etc/default/grub に行います。

CentOS7をvSphere環境上にインストールした場合、下記の様になっていました。

GRUB_TIMEOUT=5
GRUB_DISTRIBUTOR="$(sed 's, release .*$,,g' /etc/system-release)"
GRUB_DEFAULT=saved
GRUB_DISABLE_SUBMENU=true
GRUB_TERMINAL_OUTPUT="console"
GRUB_CMDLINE_LINUX="crashkernel=auto spectre_v2=retpoline rd.lvm.lv=centos/root rd.lvm.lv=centos/swap"
GRUB_DISABLE_RECOVERY="true"

この「GRUB_CMDLINE_LINUX=」行に「video=640×480」と「nomodeset」の両方を追加します。

RedHat KBではvideoだけでもいけるようなことを書いていましたが、実サーバ(DELL PowerEdge R640 UEFI設定)では問題なかったものの、vSphere仮想環境(BIOS設定)では起動途中で解像度が変わる動作をしたため「nomodeset」を追加しています。

ただ、KBにはnomodesetは悪、的な記述もあるので、ダメだったら追加する、ぐらいの方がいいかもしれません

追加後は以下の様な形になります。

GRUB_TIMEOUT=5
GRUB_DISTRIBUTOR="$(sed 's, release .*$,,g' /etc/system-release)"
GRUB_DEFAULT=saved
GRUB_DISABLE_SUBMENU=true
GRUB_TERMINAL_OUTPUT="console"
GRUB_CMDLINE_LINUX="crashkernel=auto spectre_v2=retpoline rd.lvm.lv=centos/root rd.lvm.lv=centos/swap video=640x480 nomodeset"
#GRUB_GFXMODE=800x600x24
GRUB_DISABLE_RECOVERY="true"

EFI環境の場合「grub2-mkconfig -o /etc/grub2-efi.cfg」、BIOS環境の場合「grub2-mkconfig -o /etc/grub2.cfg」を実行してgrub設定を更新します。

[root@centos7 ~]# grub2-mkconfig -o /etc/grub2.cfg
Generating grub configuration file ...
Found linux image: /boot/vmlinuz-3.10.0-1160.el7.x86_64
Found initrd image: /boot/initramfs-3.10.0-1160.el7.x86_64.img
Found linux image: /boot/vmlinuz-0-rescue-2c896cb2eafd4db586ecfbd67535d5dc
Found initrd image: /boot/initramfs-0-rescue-2c896cb2eafd4db586ecfbd67535d5dc.img
done
[root@centos7 ~]#

この後、再起動して解像度が設定されていることを確認します。

参考情報

CentOS7の場合、Ubuntu 20.04と異なり、grubでのvideoinfo/videotestコマンドがなく、vdeinfo/vbetestコマンドとなります。

参考として、下記にCentOS7での実行の様子を記載します。

grubメニューで止めて、「c」を入力し、コマンドラインモードに入ります。

CentOS7の場合はvideoinfoが搭載されていないgrubなので「vbeinfo」を実行します。

CentOS7の場合は set pager=1 の設定がされているようで出力が多い場合でも表示を止めてくれます。

表示テストは「vbetest 800x600x32」といった形で実施します。(おなじくvideotestコマンドが無い)

vbetestの終了は強制再起動(ctrl+alt+deleteなど)を行います。

Oracle Linux 8の場合

/etc/default/grub にいろいろ記述を入れてみてるのですが、解像度変更ができる気配がない・・・

また、grubでのvideoinfo, vbeinfo, videotest, vbetest はない模様

ClonezillaをLACP+タグVLAN環境で使う

$
0
0

システムディスクのバックアップ/リストアを行えるDebian/Ubuntuベースで構成されているClonezilla を使ってシステム障害に備えたバックアップディスクを取得しようと思ったのだが、ネットワークがLACP (802.3ad) +タグVLANで作成されていることに気がついた。

複数NICが搭載されている環境でClonzillaを起動すると、ネットワーク設定の際に「bond0 Use_channel_bonding」という選択肢が表示される。

しかし、次のNetwork Configで「static Use static IP address」を選択してみてもIPアドレスに関する設定のみでLACPで使うNICの選択やVLANに関する入力する場面はない。

というわけで、「enter_shell Enter_command_line_prompt._Do_it_manually」を選択してみるしかない。

選択して盛ると、設定したあと「exit」すれば続きから始まるよ、といわれる。

では、どのように設定を行うのか?下記でヒントを発見

Clonezillaの機能追加希望「#61 no lacp / etherchannel / Bonding support」(2015年07月15日~2016年10月13日)
Clonezillaのフォーラム「VLANs / bonding configuration」(2020年12月09日~2020年12月14日)

手動で設定する場合のやりかたと、ocs-live-nicbonding というスクリプトを追加して今後のバージョンで使える様にする、というものになる。

Clonezilla 2.8.0で確認してみると ocs-live-nicbonding は存在していた。

しかし、ドキュメントが見当たらないので、スクリプトを読んでみると下記仕様のようだった。

・bond0 を mode=802.3ad(LACP) 、miimon=100 で作成する
・ocs-live-nicbonding のオプションとして指定したNICがスレーブデバイスとして登録される
・xmit_hash_policy は指定しないのでデフォルトのlayer2設定

というわけで、eth3,eth4を使用してbond0を作成する場合は「ocs-live-nicbonding eth3 eth4」と実行する

「ip a s bond0」を実行してbond0が作成されていることを確認

bond0へのタグVLAN追加はvconfigコマンドで実行。

「vconfig add bond0 <VLANID>」を実行する

そうすると「bond0.<VLAN ID>」というデバイスが作成される(「ip a s bond0.<VLANID>」で確認)

IPアドレスを「ifconfig bond0.<VLANID> <IPアドレス> netmask <ネットマスク> up」を実行して設定。

で「exit」を実行すると、下記の様にClonezillaの操作に戻ります。

Ubuntu 20.04で標準のdrbd 8.4.11を使う場合の注意点

$
0
0

Ubuntu 20.04でインストールされるdrbdは8.4なのか9.11なのか?」で標準のdrbd 8.4.11と、レポジトリ追加してのdrbd 9.19.1で設定する手法について記載した。

標準のdrbd 8.4.11で使って見るかと設定してみたところ、いくつか問題が発生していた。

その1: 起動時のエラーログ

drbd起動時に下記の様な「/lib/drbd/drbd: line 148: /var/lib/linstor/loop_device_mapping: No such file or directory」というログが出力されている。

root@ubuntu02:~# systemctl status drbd
● drbd.service - DRBD -- please disable. Unless you are NOT using a cluster manager.
     Loaded: loaded (/lib/systemd/system/drbd.service; enabled; vendor preset: enabled)
     Active: active (exited) since Mon 2021-12-20 14:07:35 JST; 2s ago
    Process: 241197 ExecStart=/lib/drbd/drbd start (code=exited, status=0/SUCCESS)
   Main PID: 241197 (code=exited, status=0/SUCCESS)

Dec 20 14:07:34 ubuntu02 drbd[241197]: /lib/drbd/drbd: line 148: /var/lib/linstor/loop_device_mapping: No such file or directory
Dec 20 14:07:34 ubuntu02 drbd[241216]: [
Dec 20 14:07:34 ubuntu02 drbd[241216]:      create res: alfons
Dec 20 14:07:34 ubuntu02 drbd[241216]:    prepare disk: alfons
Dec 20 14:07:34 ubuntu02 drbd[241216]:     adjust disk: alfons
Dec 20 14:07:34 ubuntu02 drbd[241216]:      adjust net: alfons
Dec 20 14:07:34 ubuntu02 drbd[241216]: ]
Dec 20 14:07:35 ubuntu02 drbd[241258]: WARN: stdin/stdout is not a TTY; using /dev/console
Dec 20 14:07:35 ubuntu02 drbd[241197]:    ...done.
Dec 20 14:07:35 ubuntu02 systemd[1]: Finished DRBD -- please disable. Unless you are NOT using a cluster manager..
root@ubuntu02:~#

まず、 /var/lib/linstor ディレクトリは標準状態では存在していない。

root@ubuntu02:~# ls -l /var/lib/linstor
ls: cannot access '/var/lib/linstor': No such file or directory
root@ubuntu02:~#

エラーの出力元の /lib/drbd/drbd の中で /var/lib/linstor/loop_device_mapping はどういう場面で登場しているかを調べる

# Set up/detach linstor loopback devices for LINSTOR file based pools
# FIXME I think setting up these loop device mappings should be done elsewhere,
# and not in the DRBD init file; possibly we need proper support in drbdadm.
handle_linstor_loopback()
{
        local line dev file
        # || [[ -n $line ]]: in case there is no newline at EOF
        while read -r line || [[ -n $line ]] ; do
                dev=${line%%:*}
                file=${line#*:}
                test -f "$file" && test -r "$file" && test -w "$file" || continue
                # should -f be allowed?
                [[ $dev = loop* ]] || [[ $dev = /dev/loop* ]] || continue
                case "$1" in
                        # what about existing, but "wrong", mappings?
                        start) losetup "$dev" 2>/dev/null || losetup "$dev" "$file";;
                        stop)  losetup "$dev" 2>/dev/null && losetup -d "$dev";;
                esac
        done < /var/lib/linstor/loop_device_mapping

        # at least we tried.
        return 0
}

/var/lib/linstor/loop_device_mapping を入力ファイルとして指定している。

どうやらdrbd起動時に /dev/loop10 = /work/testfile.iso みたいなループデバイスを作るための設定ファイルであるようだ。

ファイルが存在しないことによるログ出力なので、下記で対応した

root@ubuntu02:~# mkdir  /var/lib/linstor
root@ubuntu02:~# touch /var/lib/linstor/loop_device_mapping
root@ubuntu02:~# 

その2: drbdの降格に失敗する

「drbdadm primary shares」でPrimaryとして動作させたあと、他方のサーバに切り替えるため降格する「drbdadm secondary shares」を実行したところ、「0: State change failed: (-12) Device is held open by someone」というメッセージで失敗した。

root@ubuntu01:~#  drbdadm secondary shares
0: State change failed: (-12) Device is held open by someone
Command 'drbdsetup-84 secondary 0' terminated with exit code 11
root@ubuntu01:~# 

誰が使っているのかと「lsof /dev/drbd0」を実行してみたところ、multipathdが握っていた。

root@ubuntu01:~#  lsof /dev/drbd0
COMMAND    PID USER   FD   TYPE DEVICE SIZE/OFF NODE NAME
multipath 4910 root    5r   BLK  147,0      0t0  890 /dev/drbd0
root@ubuntu01:~# 

まずは単純にmultipathd.socketを停止させてから降格を実施してみる。

root@ubuntu01:~# systemctl stop multipathd.socket
root@ubuntu01:~#  drbdadm secondary shares
root@ubuntu01:~#

問題無く降格できた。

というわけで、/dev/drbd0 をmultipathdの対象外とするための設定を作成する。

/etc/mul/etc/multipath.conf に 下記の様な形でblacklist を追加した。

defaults {
    user_friendly_names yes
}

blacklist {
        devnode "^drbd[0-9]"
}

「multipath -t」を実行すると、初期値などが反映された フル記載の multipathd設定が表示されるので、 blacklist セクションに drbdに関する記述が追加されていることを確認する。

この対処後は、multipathdを起動した状態であっても drbdの降格に成功するようになった。


ラズパイ3のOSMCがアップデートされてなかった

$
0
0

ラズパイ3をメディアプレーヤーとして使うためにOSMCをインストールしているんですが、確認してみたら「OSMC November 2020 2020.11-1」からアップデートされていなかったので調査。

GUIからやってみると、updateを取得にしにいくもののすぐに終わる。

じゃあ、ssh接続してコマンドでやってみるか、と、「Keeping your OSMC system up to date」にある「sudo apt-get update」を実行してみるとエラー

osmc@osmc:~$ sudo apt-get update
Get:1 http://security.debian.org buster/updates InRelease [65.4 kB]
Get:2 http://ftp.debian.org/debian buster InRelease [122 kB]
Get:4 http://ftp.debian.org/debian buster-updates InRelease [51.9 kB]
Hit:3 http://ftp.fau.de/osmc/osmc/apt buster InRelease
Reading package lists... Done
E: Repository 'http://security.debian.org buster/updates InRelease' changed its 'Suite' value from 'stable' to 'oldstable'
N: This must be accepted explicitly before updates for this repository can be applied. See apt-secure(8) manpage for details.
N: Repository 'http://ftp.debian.org/debian buster InRelease' changed its 'Version' value from '10.10' to '10.11'
E: Repository 'http://ftp.debian.org/debian buster InRelease' changed its 'Suite' value from 'stable' to 'oldstable'
N: This must be accepted explicitly before updates for this repository can be applied. See apt-secure(8) manpage for details.
E: Repository 'http://ftp.debian.org/debian buster-updates InRelease' changed its 'Suite' value from 'stable-updates' to 'oldstable-updates'
N: This must be accepted explicitly before updates for this repository can be applied. See apt-secure(8) manpage for details.
osmc@osmc:~$

このエラーの場合は、–allow-releaseinfo-change オプションで対応できるとのこと

osmc@osmc:/etc/apt$ sudo apt-get update --allow-releaseinfo-change
Get:1 http://security.debian.org buster/updates InRelease [65.4 kB]
Get:2 http://ftp.debian.org/debian buster InRelease [122 kB]
Get:3 http://ftp.debian.org/debian buster-updates InRelease [51.9 kB]
Get:5 http://security.debian.org buster/updates/main armhf Packages [306 kB]
Get:6 http://security.debian.org buster/updates/main Translation-en [166 kB]
Hit:4 http://ftp.fau.de/osmc/osmc/apt buster InRelease
Get:7 http://ftp.debian.org/debian buster/main armhf Packages [7698 kB]
Get:8 http://ftp.debian.org/debian buster-updates/main armhf Packages.diff/Index [9100 B]
Get:9 http://ftp.debian.org/debian buster/main Translation-en [5968 kB]
Get:10 http://ftp.debian.org/debian buster/contrib armhf Packages [40.1 kB]
Get:11 http://ftp.debian.org/debian buster/non-free armhf Packages [62.1 kB]
Get:12 http://ftp.debian.org/debian buster/non-free Translation-en [88.8 kB]
Get:13 http://ftp.debian.org/debian buster-updates/main armhf Packages 2021-09-18-2009.26.pdiff [1109 B]
Get:14 http://ftp.debian.org/debian buster-updates/main armhf Packages 2021-09-28-1420.03.pdiff [184 B]
Get:15 http://ftp.debian.org/debian buster-updates/main armhf Packages 2021-10-26-2004.40.pdiff [283 B]
Fetched 14.3 MB in 16s (881 kB/s)
Reading package lists... Done
N: Repository 'http://security.debian.org buster/updates InRelease' changed its 'Suite' value from 'stable' to 'oldstable'
N: Repository 'http://ftp.debian.org/debian buster InRelease' changed its 'Version' value from '10.10' to '10.11'
N: Repository 'http://ftp.debian.org/debian buster InRelease' changed its 'Suite' value from 'stable' to 'oldstable'
N: Repository 'http://ftp.debian.org/debian buster-updates InRelease' changed its 'Suite' value from 'stable-updates' to 'oldstable-updates'
osmc@osmc:/etc/apt$

これは大丈夫なのかな?と心配になりつつも「E:」がないので大丈夫だろう、と、「sudo apt upgrade」を実行

osmc@osmc:/etc/apt$ sudo apt upgrade
Running apt upgrade on your system can cause adverse effects on your system
Use apt full-upgrade, which is the proper way to administer a Debian / Ubuntu system
For more information about updates, see https://osmc.tv/wiki/general/keeping-your-osmc-system-up-to-date/
osmc@osmc:/etc/apt$

apt full-upgrade を使えと怒られた

osmc@osmc:/etc/apt$ sudo apt full-upgrade
Reading package lists... Done
Building dependency tree
Reading state information... Done
Calculating upgrade... Done
The following packages were automatically installed and are no longer required:
  armv7-libass-osmc armv7-libnfs-osmc dh-python g++-6 gnupg-agent libass5 libavcodec57 libavformat57 libavutil55 libbind9-140
  libbluray1 libcdio13 libcryptsetup4 libdevmapper-event1.02.1 libdns162 libegl1-mesa libenca0 libevent-2.0-5 libgdbm3
  libgl1-mesa-glx libgles2-mesa libicu57 libisc160 libisccc140 libisccfg140 libiso9660-8 liblivemedia57 liblvm2app2.2 liblwres141
  libmicrodns0 libncurses5 libnfs8 libntfs-3g871 libpcre16-3 libperl5.24 libpostproc54 libprocps6 libprotobuf-lite10 libproxy1v5
  libpython3.5-minimal libpython3.5-stdlib libsndio6.1 libssl1.0.2 libstdc++-6-dev libswresample2 libswscale4 libunistring0
  libupnp6 libva-drm1 libva-wayland1 libva-x11-1 libva1 libvlccore8 libvpx4 libwayland-egl1-mesa libwebpmux2 libx264-148
  libx265-95 python-apt python-certifi python-chardet python-dbus python-gi python-gobject python-gobject-2 python-idna
  python-imaging python-pexpect python-pil python-ptyprocess python-requests python-six python-unidecode python-urllib3
  python3-distutils python3-lib2to3 python3.5 python3.5-minimal wireless-firmware-osmc
Use 'sudo apt autoremove' to remove them.
The following NEW packages will be installed:
  armv7-bluezalsa-osmc libbluetooth3 libfdk-aac1 libpython3.7 libsbc1 python-crypto python-ldb python-samba python-tdb
  python3-dbus python3-gi python3-pil python3-unidecode rbp2-image-5.10.78-2-osmc rbp2-mesa-osmc samba-common-bin
The following packages will be upgraded:
  apt apt-utils armv7-bluez-osmc armv7-eventlircd-osmc armv7-network-osmc armv7-remote-osmc avahi-daemon base-files
  base-files-osmc bind9-host ca-certificates curl debconf debian-archive-keyring distro-info-data iproute2 libapt-inst2.0
  libapt-pkg5.0 libavahi-client3 libavahi-common-data libavahi-common3 libavahi-compat-libdnssd1 libavahi-core7 libavcodec58
  libavformat58 libavutil56 libbind9-161 libbsd0 libc-bin libc-dev-bin libc-l10n libc6 libc6-dev libcairo2 libcurl4 libdns1104
  libgcrypt20 libglib2.0-0 libgnutls30 libgssapi-krb5-2 libhogweed4 libicu63 libisc1100 libisccc161 libisccfg163 libk5crypto3
  libkrb5-3 libkrb5support0 libldap-2.4-2 libldap-common libldb1 liblirc-client0 liblwres161 liblz4-1 libmariadb3 libnettle6
  libnss-myhostname libnss3 libntfs-3g883 libopenjp2-7 libp11-kit0 libpam-systemd libpostproc55 libpython3.7-minimal
  libpython3.7-stdlib libsmbclient libsndfile1 libssl-dev libssl1.1 libswresample3 libswscale5 libsystemd0 libtiff5 libudev1
  libvlc-bin libvlc5 libvlccore9 libwbclient0 libwebp6 libwebpdemux2 libwebpmux3 libx11-6 libx11-data libx11-xcb1 libxml2
  libzstd1 linux-libc-dev locales mariadb-common mediacenter-addon-osmc mediacenter-eventclients-common-osmc
  mediacenter-send-osmc mediacenter-skin-osmc multiarch-support ntfs-3g openssl openvpn psmisc python3.7 python3.7-minimal
  rbp-bootloader-osmc rbp-userland-osmc rbp2-device-osmc rbp2-ftr-osmc rbp2-kernel-osmc rbp2-libcec-osmc rbp2-mediacenter-osmc
  samba-common samba-libs sudo systemd systemd-sysv tzdata udev vlc vlc-bin vlc-data vlc-l10n vlc-plugin-base vlc-plugin-qt
  vlc-plugin-video-output wpasupplicant
122 upgraded, 16 newly installed, 0 to remove and 0 not upgraded.
Need to get 223 MB of archives.
After this operation, 76.9 MB of additional disk space will be used.
Do you want to continue? [Y/n] y
Get:1 http://security.debian.org buster/updates/main armhf libsmbclient armhf 2:4.9.5+dfsg-5+deb10u2 [155 kB]
<略>
Get:61 http://ftp.fau.de/osmc/osmc/apt buster/main armhf rbp2-device-osmc armhf 1.5.7 [553 kB]
Get:62 http://ftp.fau.de/osmc/osmc/apt buster/main armhf multiarch-support armhf 2.28-110.1 [215 kB]
Fetched 223 MB in 2min 18s (1619 kB/s)
Extracting templates from packages: 100%
Preconfiguring packages ...
(Reading database ... 41428 files and directories currently installed.)
Preparing to unpack .../base-files_10.3+deb10u11_armhf.deb ...
Unpacking base-files (10.3+deb10u11) over (10.3+deb10u7) ...
Setting up base-files (10.3+deb10u11) ...
<略>

Preparing to unpack .../56-liblwres161_1%3a9.11.5.P4+dfsg-5.1+deb10u6_armhf.deb ...
Unpacking liblwres161:armhf (1:9.11.5.P4+dfsg-5.1+deb10u6) over (1:9.11.5.P4+dfsg-5.1+deb10u2) ...
Preparing to unpack .../57-avahi-daemon_0.7-4+deb10u1_armhf.deb ...
Unpacking avahi-daemon (0.7-4+deb10u1) over (0.7-4+b1) ...
dpkg: warning: unable to delete old directory '/etc/resolvconf/update-libc.d': Directory not empty
dpkg: warning: unable to delete old directory '/etc/resolvconf': Directory not empty
Preparing to unpack .../58-mediacenter-addon-osmc_3.0.737_all.deb ...
Unpacking mediacenter-addon-osmc (3.0.737) over (3.0.699) ...
dpkg: warning: unable to delete old directory '/usr/share/kodi/addons/script.module.osmcsetting.updates/resources/osmc': Directory not empty
dpkg: warning: unable to delete old directory '/usr/share/kodi/addons/script.module.osmcsetting.services/resources/osmc': Directory not empty
dpkg: warning: unable to delete old directory '/usr/share/kodi/addons/script.module.osmcsetting.remotes/resources/osmc': Directory not empty
dpkg: warning: unable to delete old directory '/usr/share/kodi/addons/script.module.osmcsetting.pi/resources/osmc': Directory not empty
dpkg: warning: unable to delete old directory '/usr/share/kodi/addons/script.module.osmcsetting.networking/resources/osmc': Directory not empty
dpkg: warning: unable to delete old directory '/usr/share/kodi/addons/script.module.osmcsetting.logging/resources/osmc': Directory not empty
dpkg: warning: unable to delete old directory '/usr/share/kodi/addons/script.module.osmcsetting.apfstore/resources/osmc': Directory not empty
Preparing to unpack .../59-mediacenter-skin-osmc_19.1.0-19_all.deb ...
Unpacking mediacenter-skin-osmc (19.1.0-19) over (18.5.0-4) ...
Preparing to unpack .../60-libnss3_2%3a3.42.1-1+deb10u4_armhf.deb ...
Unpacking libnss3:armhf (2:3.42.1-1+deb10u4) over (2:3.42.1-1+deb10u3) ...
Preparing to unpack .../61-rbp2-libcec-osmc_6.0.2-3_armhf.deb ...
Unpacking rbp2-libcec-osmc (6.0.2-3) over (4.0.4-5) ...
<略>
Setting up libavformat58:armhf (7:4.1.8-0+deb10u1) ...
Setting up libbind9-161:armhf (1:9.11.5.P4+dfsg-5.1+deb10u6) ...
Setting up samba-common-bin (2:4.9.5+dfsg-5+deb10u2) ...
Checking smb.conf with testparm
Load smb config files from /etc/samba/smb.conf
Loaded services file OK.
Server role: ROLE_STANDALONE

Done
Setting up vlc-plugin-base:armhf (3.0.12-0+deb10u1) ...
Setting up vlc (3.0.12-0+deb10u1) ...
Setting up bind9-host (1:9.11.5.P4+dfsg-5.1+deb10u6) ...
Setting up avahi-daemon (0.7-4+deb10u1) ...
Removing obsolete conffile /etc/network/if-up.d/avahi-daemon ...
Removing obsolete conffile /etc/resolvconf/update-libc.d/avahi-daemon ...
Setting up rbp2-mediacenter-osmc (19.3.0-7) ...
Setting up rbp2-device-osmc (1.5.7) ...
Processing triggers for dbus (1.12.20-0+deb10u1) ...
Processing triggers for mime-support (3.62) ...
Processing triggers for libc-bin (2.28-110.1) ...
Processing triggers for ntp (1:4.2.8p12+dfsg-4) ...
Processing triggers for ca-certificates (20200601~deb10u2) ...
Updating certificates in /etc/ssl/certs...
0 added, 0 removed; done.
Running hooks in /etc/ca-certificates/update.d...
done.
Processing triggers for libvlc-bin:armhf (3.0.12-0+deb10u1) ...
osmc@osmc:/etc/apt$

そして再起動

無事に「OSMC November 2021 2021.11-2」にアップデートされました。

が・・・自作のプラグインが無効化されてしまいました・・・

ESXiでユーザ名の入ったパスワードが設定できないので設定を変えた

$
0
0

ESXi 6.7, ESXi 7.0 の単体環境で、テスト用のユーザを「test」で作成し、パスワードを「test.1234!」で設定しようとしたところエラーとなった。

画像

「弱いパスワード: 個人ログイン情報に基づいています」

Create User
キー  haTask-ha-folder-root-vim.host.LocalAccountManager.createUser-960490766
説明  ローカル ユーザー アカウントを作成します
フォルダ:
状態  失敗 - 一般的なシステム エラーが発生しました: Weak password: based on personal login information. *** passwd: Authentication token manipulation error

エラー 弱いパスワード: 個人ログイン情報に基づいています。

ただ、パスワードを「test.1234!a」と1文字付け加えるだけで設定は可能だった。

怪しい設定としては「VMware Host Client でのパスワードとアカウント ロックアウト ポリシーの構成」にある「Security.PasswordQualityControl」設定となる。

標準では「retry=3 min=disabled,disabled,disabled,7,7」となっている。

これを解釈すると

「retry=3」パスワード間違い3回まで許容
「min=disabled,disabled,disabled,7,7」 min=N0,N1,N2,N3,N4
  N0: 1種類の文字だけの場合。disabledなので不許可
  N1: 2種類の文字のパスワードの場合。disabledなので不許可
  N2: パスフレーズの最小文字列。disabledなので不許可
  N3: 3種類の文字のパスワードの場合。7文字以上必要
  N4: 4種類の文字のパスワードの場合。7文字以上必要

ということになる。

なぜユーザtestの場合、「test.1234!」がダメなのか、と考えると、おそらく、testが文字種別としてカウント対象外となり「.1234!」のみで判断しているためではないだろうか?ということになる。

「.1234!」は数字と記号の2種類だけなので、disabledで不許可。
「.1234!a」は 数字と記号 と英語小文字の3種類あり、7文字以上なので許可。

では、2種類だけであっても通るようにすればいいのか、と 「retry=3 min=disabled,7,disabled,7,7」 と設定してみたところ、エラー・・・

画像
Update User
キー   haTask-ha-folder-root-vim.host.LocalAccountManager.updateUser-960491342
説明   ローカル ユーザー アカウントを更新します

フォルダ:
状態   失敗 - 一般的なシステム エラーが発生しました: pam_passwdqc: Error parsing parameter "min=disabled,7,disabled,7,7": Invalid parameter value. *** passwd: Critical error - immediate abort

エラー

「retry=3 min=7,7,7,7,7」 でもエラーになった・・・

しかし、なぜか「 retry=3 min=8,8,8,7,7」だとエラーとならずに、パスワード変更が完了した。

なぜ????

ちなみに、なぜ8で設定してみようと思ったかは「ESXi 6.5 & later Password policy」「ESXi 7 Password policy」で例としてあげられていたためなんですが、問題はこのページだと「disabled」は「8」に相当するって書いてあること。

ほんとにdisabled=8なんだろうか???「14」と設定できることを考えるとあやしいなぁ・・とは思っている。

Oracle Cloud上のOracle Linux 7インスタンスでyum check-updateを実行した際にELBA-2021-9629,ELBA-2021-9631のメッセージが出力される

$
0
0

Oracle Cloud上のOracle Linux 7インスタンスでyum check-updateを実行したところ、下記の様なメッセージが出力された。

[osakanataro@ocilinux ~]$ sudo yum check-update
読み込んだプラグイン:langpacks, ulninfo
Update notice ELBA-2021-9629 (ol7_developer から) is broken, or a bad duplicate, skipping.
You should report this problem to the owner of the ol7_developer repository.
To help pinpoint the issue, please attach the output of "yum updateinfo --verbose" to the report.
Update notice ELBA-2021-9631 (ol7_developer から) is broken, or a bad duplicate, skipping.
Security: kernel-uek-4.14.35-2047.510.5.2.el7uek.x86_64 is an installed security update
Security: kernel-uek-4.14.35-2047.504.2.el7uek.x86_64 is the currently running version
[osakanataro@ocilinux ~]$

とりあえず、出力にかいてある「yum updateinfo –verbose」を実行してみる。

[osakanataro@ocilinux ~]$ sudo yum updateinfo --verbose
無効になっているため、プラグイン「osmsplugin」は読み込みません
無効になっているため、プラグイン「rhnplugin」は読み込みません
プラグイン「ulninfo」を読み込んでいます
プラグイン「langpacks」を読み込んでいます
Adding en_US.UTF-8 to language list
Config time: 0.091
Yum version: 3.4.3
rpmdb time: 0.000
Setting up Package Sacks
pkgsack time: 0.255
Duplicate of ELBA-2021-9629 differs in some fields:
<<<<<<< ol7_developer:description
'[2.53.1-1]\n- Update to version 2.53.1\n\n[2.53.0-1]\n- Update to version 2.53.0\n\n[2.52.1-1]\n- Update to version 2.52.1\n\n[2.52.0-1]\n- Update to version 2.52.0\n\n[2.51.0-1]\n- Update to version 2.51.0\n\n[2.50.0-1]'
=======
'[2.53.1-1]\n- Update to version 2.53.1'
>>>>>>> ol7_addons:description
Update notice ELBA-2021-9629 (ol7_developer から) is broken, or a bad duplicate, skipping.
You should report this problem to the owner of the ol7_developer repository.
To help pinpoint the issue, please attach the output of "yum updateinfo --verbose" to the report.
Duplicate of ELBA-2021-9631 differs in some fields:
<<<<<<< ol7_developer:description
'[3.4.1-1]\n- Update to version 3.4.1\n\n[3.4.0-1]\n- Update to version 3.4.0\n\n[3.3.3-1]\n- Update to version 3.3.3\n\n[3.3.2-1]\n- Update to version 3.3.2\n\n[3.3.1-1]\n- Update to version 3.3.1\n\n[3.3.0-1]\n- Update to version 3.3.0\n\n[3.2.2-1]\n- Update to version 3.2.2\n\n[3.2.1-1]\n- Update to version 3.2.1\n\n[3.2.0-1]\n- Update to version 3.2.0\n\n[3.1.2-1]\n- Update to version 3.1.2\n\n[3.1.1-1]\n- Update to version 3.1.1\n\n[3.1.0-1]\n- Update to version 3.1.0\n\n[3.0.5-1]\n- Update to version 3.0.5\n\n[3.0.4-1]\n- Update to version 3.0.4\n\n[3.0.3-1]\n- Update to version 3.0.3\n\n[3.0.2-1]\n- Update to version 3.0.2\n\n[3.0.1-1]\n- Update to version 3.0.1\n\n[3.0.0-1]'
=======
'[3.4.1-1]\n- Update to version 3.4.1'
>>>>>>> ol7_addons:description
Update notice ELBA-2021-9631 (ol7_developer から) is broken, or a bad duplicate, skipping.
updateinfo time: 5.586
オブジェクトの更新を構築しています
up:Obs Init time: 4.605
up:simple updates time: 0.024
up:obs time: 0.008
up:condense time: 0.000
updates time: 10.097
Security: kernel-uek-4.14.35-2047.510.5.2.el7uek.x86_64 is an installed security update
Security: kernel-uek-4.14.35-2047.504.2.el7uek.x86_64 is the currently running version
updateinfo summary done
[osakanataro@ocilinux ~]$ 

よくわからん。

該当するErattaは下記と
ELBA-2021-9629 – python-oci-sdk bug fix update
ELBA-2021-9631 – python-oci-cli bug fix update

特に解決につながりそうな情報はない。

レポジトリ一覧を取得してみる

[osakanataro@ocilinux ~]$ 
 yum repolist all
読み込んだプラグイン:langpacks, ulninfo
リポジトリー ID                      リポジトリー名                                                                                               状態
ol7_MODRHCK/x86_64                   Latest RHCK with fixes from Oracle for Oracle Linux 7Server (x86_64)                                         無効
ol7_UEKR3/x86_64                     Latest Unbreakable Enterprise Kernel Release 3 for Oracle Linux 7Server (x86_64)                             無効
ol7_UEKR3_OFED20/x86_64              OFED supporting tool packages for Unbreakable Enterprise Kernel on Oracle Linux 7 (x86_64)                   無効
ol7_UEKR4/x86_64                     Latest Unbreakable Enterprise Kernel Release 4 for Oracle Linux 7Server (x86_64)                             無効
ol7_UEKR4_OFED/x86_64                OFED supporting tool packages for Unbreakable Enterprise Kernel Release 4 on Oracle Linux 7 (x86_64)         無効
ol7_UEKR4_archive/x86_64             Unbreakable Enterprise Kernel Release 4 for Oracle Linux 7Server (x86_64) - Archive                          無効
ol7_UEKR5/x86_64                     Latest Unbreakable Enterprise Kernel Release 5 for Oracle Linux 7Server (x86_64)                             有効:           592
ol7_UEKR5_RDMA/x86_64                Oracle Linux 7 UEK5 RDMA (x86_64)                                                                            無効
ol7_UEKR5_archive/x86_64             Unbreakable Enterprise Kernel Release 5 for Oracle Linux 7Server (x86_64) - Archive                          無効
ol7_UEKR6/x86_64                     Latest Unbreakable Enterprise Kernel Release 6 for Oracle Linux 7Server (x86_64)                             無効
ol7_UEKR6_RDMA/x86_64                Oracle Linux 7 UEK6 RDMA (x86_64)                                                                            無効
ol7_addons/x86_64                    Oracle Linux 7Server Add ons (x86_64)                                                                        有効:           579
ol7_developer/x86_64                 Oracle Linux 7Server Development Packages (x86_64)                                                           有効:   1,571+1,295
ol7_developer_EPEL/x86_64            Oracle Linux 7Server EPEL Packages for Development (x86_64)                                                  有効: 28,888+12,373
ol7_developer_UEKR5/x86_64           Oracle Linux 7Server Unbreakable Enterprise Kernel Release 5  Packages for Development and test (x86_64)     無効
ol7_developer_UEKR6/x86_64           Developer Preview of UEK Release 6 (x86_64)                                                                  無効
ol7_developer_kvm_utils/x86_64       Oracle Linux 7Server KVM Utilities for Development and test (x86_64)                                         無効
ol7_developer_php70/x86_64           Oracle Linux 7Server PHP 7.0 Packages for Development and test (x86_64)                                      無効
ol7_developer_php71/x86_64           Oracle Linux 7Server PHP 7.1 Packages for Development and test (x86_64)                                      無効
!ol7_developer_php72/x86_64          Oracle Linux 7Server PHP 7.2 Packages for Development and test (x86_64)                                      無効
ol7_developer_php74/x86_64           Oracle Linux 7Server PHP 7.4 Packages for Development and test (x86_64)                                      有効:           806
ol7_ksplice                          Ksplice for Oracle Linux 7Server (x86_64)                                                                    有効:        19,729
ol7_kvm_utils/x86_64                 Oracle Linux 7Server KVM Utilities (x86_64)                                                                  無効
ol7_latest/x86_64                    Oracle Linux 7Server Latest (x86_64)                                                                         有効:        23,697
ol7_latest_archive/x86_64            Oracle Linux 7Server Latest (x86_64) - Archive                                                               無効
ol7_leapp/x86_64                     Leapp Upgrade Utilities for Oracle Linux 7Server (x86_64)                                                    無効
ol7_optional_archive/x86_64          Oracle Linux 7Server Optional (x86_64) - Archive                                                             無効
ol7_optional_latest/x86_64           Oracle Linux 7Server Optional Latest (x86_64)                                                                有効:        16,690
ol7_security_validation/x86_64       Oracle Linux 7Server Update 3 (x86_64) Security Validations                                                  無効
ol7_software_collections/x86_64      Software Collection Library release 3.0 packages for Oracle Linux 7 (x86_64)                                 有効:        17,074
ol7_u0_base/x86_64                   Oracle Linux 7Server GA installation media copy (x86_64)                                                     無効
ol7_u1_base/x86_64                   Oracle Linux 7Server Update 1 installation media copy (x86_64)                                               無効
ol7_u2_base/x86_64                   Oracle Linux 7Server Update 2 installation media copy (x86_64)                                               無効
ol7_u3_base/x86_64                   Oracle Linux 7Server Update 3 installation media copy (x86_64)                                               無効
ol7_u4_base/x86_64                   Oracle Linux 7Server Update 4 installation media copy (x86_64)                                               無効
ol7_u5_base/x86_64                   Oracle Linux 7Server Update 5 installation media copy (x86_64)                                               無効
ol7_u6_base/x86_64                   Oracle Linux 7Server Update 6 installation media copy (x86_64)                                               無効
ol7_u7_base/x86_64                   Oracle Linux 7Server Update 7 installation media copy (x86_64)                                               無効
ol7_u8_base/x86_64                   Oracle Linux 7Server Update 8 installation media copy (x86_64)                                               無効
ol7_u8_security_validation/x86_64    Oracle Linux 7Server Update 8 (x86_64) Security Validations                                                  無効
ol7_u9_base/x86_64                   Oracle Linux 7Server Update 9 installation media copy (x86_64)                                               無効
ol7_x86_64_userspace_ksplice         Ksplice aware userspace packages for Oracle Linux 7Server (x86_64)                                           無効
packages-microsoft-com-prod          packages-microsoft-com-prod                                                                                  有効:         1,085
repolist: 110,711
[osakanataro@ocilinux ~]$ $ ls /etc/yum.repos.d/
ksplice-ol7.repo               oracle-linux-ol7.repo.20200710      oracle-softwarecollection-ol7.repo.bkp         uek-ol7.repo.20200406
microsoft.repo                 oracle-linux-ol7.repo.bkp           oracle-softwarecollection-ol7.repo.rpmnew.bkp  uek-ol7.repo.bkp
oracle-epel-ol7.repo           oracle-linux-ol7.repo.rpmnew.bkp    oraclelinux-developer-ol7.repo                 uek-ol7.repo.rpmnew.bkp
oracle-epel-ol7.repo.20190815  oracle-php-ol7.repo                 oraclelinux-developer-ol7.repo.20200406        virt-ol7.repo
oracle-epel-ol7.repo.20210217  oracle-php-ol7.repo.20200406        public-yum-ol7.repo.sav                        virt-ol7.repo.bkp
oracle-linux-ol7.repo          oracle-softwarecollection-ol7.repo  uek-ol7.repo                                   virt-ol7.repo.rpmnew.bkp
[osakanataro@ocilinux ~]$

レポジトリがいろいろあるけど、ファイルはもっと多いなぁ・・・なんでだっけ?と記録を漁ったところ2021年6月に行った「Oracle Cloud上の古いOracle Linux 7インスタンスのyum設定を更新する」でのレポジトリ設定更新によるものだった。(Oracle側の記載は 2021.03 – Oracle Linux 7およびOracle Linux 8インスタンスのYumの更新 )

パッケージ情報捜索

ELBA-2021-9629のpython-oci-sdk

[osakanataro@ocilinux ~]$ yum info python-oci-sdk
読み込んだプラグイン:langpacks, ulninfo
利用可能なパッケージ
名前                : python-oci-sdk
アーキテクチャー    : x86_64
バージョン          : 2.36.0
リリース            : 1.el7
容量                : 15 M
リポジトリー        : ol7_developer/x86_64
要約                : Oracle Cloud Infrastructure Python SDK
URL                 : http://pypi.python.org/pypi/oci
ライセンス          : Apache2.0
説明                : Python SDK for Oracle Cloud Infrastructure.

[osakanataro@ocilinux ~]$ rpm -qa|grep oci-sdk
python36-oci-sdk-2.54.0-1.el7.x86_64
[osakanataro@ocilinux ~]$

ELBA-2021-9631のpython-oci-cli

[osakanataro@ocilinux ~]$ yum info python-oci-cli
読み込んだプラグイン:langpacks, ulninfo
利用可能なパッケージ
名前                : python-oci-cli
アーキテクチャー    : noarch
バージョン          : 2.9.0
リリース            : 1.el7
容量                : 1.2 M
リポジトリー        : ol7_developer/x86_64
要約                : Oracle Cloud Infrastructure CLI client
URL                 : http://pypi.python.org/pypi/oci-cli
ライセンス          : Apache2.0
説明                : Python SDK for Oracle Cloud Infrastructure command line client utilities.

[osakanataro@ocilinux ~]$ rpm -qa|grep oci-cli
python36-oci-cli-3.4.2-1.el7.noarch
[osakanataro@ocilinux ~]$

どちらもレポジトリにあるパッケージバージョンより新しいものがインストールされている状態になっている。

そういえば、いつだったかメンテナンスした時に、oci-sdkとoci-cliが古かったのでバージョンアップしたんだっけ、という思い出したので、状況はあるいみ解決した。

https://github.com/oracle/oci-cli/releases

ssh接続を使って2つ先にある管理画面Webにアクセスする

$
0
0

下記の様な感じで、踏み台サーバを2つ経由した先にある管理画面Webを、手元の操作端末上のブラウザで確認したい。

sshによるトンネル接続を利用したSOCKS proxyを使うことで実現できる。

構成の概要としては下記の様な形となる。

操作端末はWindows 10で、puttyを使用してssh接続を行い、Firefoxブラウザで管理画面を開く、という想定。

まず、SSH接続1について設定

[Session]-[Host Name] で 踏み台サーバ1 とポート番号を指定(port 22)
[Connection]-[Data]-[Auto-login username] で 踏み台サーバ1のログインユーザ名
[Connection]-[SSH]-[Tunnels]の[Forwarded ports] で 「L10022 踏み台サーバ2:22」(“Local”,”Souce port:10022″,”Destination: 踏み台サーバ2:22″)
公開鍵認証を使用する場合は [Connection]-[SSH]-[Auth]の[Private key file for authentication]に指定

これにより、「踏み台サーバ1へのSSH接続1」と「操作端末のローカルポート10022にアクセスすると踏み台サーバ2のポート22に転送されるトンネル接続」が出来る。

次に作成されたトンネル接続を利用したSSH接続2を設定

[Session]-[Host Name] で localhost ポート 10022 を指定
[Connection]-[Data]-[Auto-login username] で 踏み台サーバ2のログインユーザ名
[Connection]-[SSH]-[Tunnels]の[Forwarded ports] で 「D10080」(“Dynamic”,”Souce port:10080)
公開鍵認証を使用する場合は [Connection]-[SSH]-[Auth]の[Private key file for authentication]に指定

これで「”接続端末のローカルポート10022″から 踏み台サーバ ポート22 に転送されてSSH接続2」と「操作端末のローカルポート 10080 にアクセスすると、踏み台サーバ2 上からネットワーク接続できるトンネル接続」が出来る。

最後に、Firefoxの[General]-[Network Settings]にて、「Manual proxy configuration」で「SOCKS Host: localhost Port: 10080」と設定する。

これで操作端末上から閉鎖網2上にあるWeb管理画面を開けるようになった。

TeraTermマクロでコマンド出力結果を使って別のコマンドを実行する

$
0
0

NetAppの設定をTeraTermマクロで取得出来るようにマクロを作成中し https://github.com/osakanataro/get-ontap-config で公開中です。

物理ディスク一覧を作成する際、単純に「storage disk show」で取得すると、2ノードの表示が入り交じり、どちらに所属している物理ディスクなのか判別が面倒。

なので、「storage disk show -nodelist ノード名」という形で出力を分けたいのだが、NetAppに対して「system node show -fields node」で取得したノード一覧からノード名を抜き出して、それぞれに対してコマンドを実行するためには、TeraTermマクロで実装できるのかを調査した。

調査

まず、NetAppのノード名一覧の出力を確認

netapp01::> system node show -fields node
node
-------------
netapp01-01
netapp01-02
2 entries were displayed.

netapp01::>

ノードとして「netapp01-01」と「netapp01-02」があることを確認。

また、system node showコマンドの出力のうち最初の2行はヘッダ、そして、ノード名出力後に「~ entries were displayed.」と出力がある。これらは使わないので除外が必要。

スクリプト

サンプルとして、ノード一覧を表示して、各ノードに対して「system node run -node ノード名 hostname」を実行する、というものを作成した。

setsync 1
timeout=60
strdim nodenames 20
I=0
sendln 'system node show -fields node'
recvln ; コマンド入力 のecho出力  をスキップ
recvln ; ヘッダ部分 をスキップ
recvln ; --- 部分 をスキップ

endflag=1
while endflag=1
	recvln
	strscan inputstr 'displayed.'
	if result>0 then
		endflag=0
	else
		nodenames[I] = inputstr
		I=I+1
	endif
endwhile
wait '::> '

J=0
while I > J
	sendln 'system node run -node ' nodenames[J] ' hostname'
	wait '::> '
	J=J+1
endwhile

setsync 0

スクリプトの解説

今回のようなコマンド出力結果を受け取る場合は、「setsync 1」を実行して、確実に出力結果を受け取る設定(同期)とする必要がある。

次に「recvln」する際、TeraTermマクロからNetAppに送信した文字列もrecvlnで受け取ることになっているため、最初の1行は捨てている。(recvlnして、その後、何の処理もしていない)

続けて2行がヘッダなので、「recvln」で2行分受け取り、何も処理していない。

「2 entries were displayed.」というエントリ以降の行は不要なので、whileを終了する処理を入れるが、1台だったりすると1 entry wasとかになったりしそうなのでdisplayed.だけで終了検出。

whileを抜けたあとは、コマンドプロンプトの「::> 」が来るまで待ちを入れる。

スクリプト実行例

netapp01::> system node show -fields node
node
-------------
netapp01-01
netapp01-02
2 entries were displayed.

netapp01::> system node run -node netapp01-01 hostname
netapp01-01
netapp01::> system node run -node netapp01-02 hostname
netapp01-02
netapp01::>

Viewing all 1106 articles
Browse latest View live